#graphql apollo server express
Explore tagged Tumblr posts
Visit Tumblr Blog
Explore Tumblr blogs with no restrictions, modern design and the best experience.
Last Seen Tumblr Blogs


Fun Fact
The average Tumblr user visits about 67 pages every month.
Text
GraphQL Client Side & Server-Side Components Explained with Examples for API Developers
Full Video Link - https://youtube.com/shorts/nezkbeJlAIk Hi, a new #video on #graphql #mutation published on #codeonedigest #youtube channel. @java @awscloud @AWSCloudIndia @YouTube #youtube @codeonedigest #graphql #graphqlresolver #graphqltutorial
Let’s understand the GraphQL components and the way they communicate with each other. The entire application components can be categories in to server side and client-side components. Server-side Components – GraphQL server forms the core component on the server side and allows to parse the queries coming from GraphQL client applications. Apollo Server is most commonly used implementation of…

View On WordPress
#graphql#graphql api#graphql apollo server express#graphql apollo server tutorial#graphql client#graphql client apollo#graphql client java#graphql client react#graphql client side#graphql client spring boot#graphql client tutorial#graphql example#graphql explained#graphql java client example#graphql schema and resolver#graphql server and client#graphql server apollo#graphql server components#graphql server tutorial#graphql tutorial
0 notes
Text
Introduction to GraphQL for Full Stack Applications
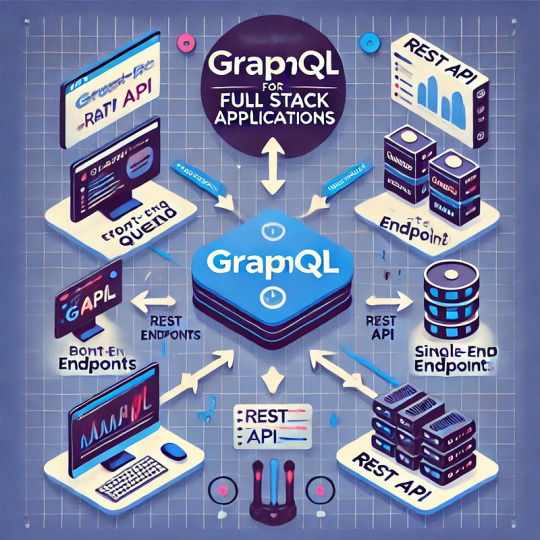
What is GraphQL?
GraphQL is a query language for APIs and a runtime for executing those queries by leveraging a type system defined for the data. Developed by Facebook in 2012 and open-sourced in 2015, GraphQL provides a flexible and efficient alternative to REST APIs by allowing clients to request exactly the data they need — nothing more, nothing less.
Why Use GraphQL for Full Stack Applications?
Traditional REST APIs often come with challenges such as over-fetching, under-fetching, and versioning complexities. GraphQL solves these issues by offering:
Flexible Queries: Clients can specify exactly what data they need.
Single Endpoint: Unlike REST, which may require multiple endpoints, GraphQL exposes a single endpoint for all queries.
Strongly Typed Schema: Ensures clear data structure and validation.
Efficient Data Fetching: Reduces network overhead by retrieving only necessary fields.
Easier API Evolution: No need for versioning — new fields can be added without breaking existing queries.
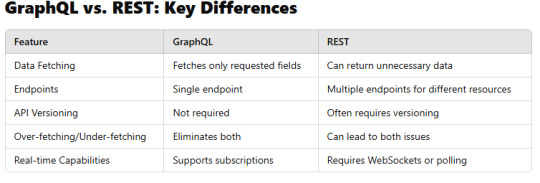
GraphQL vs. REST: Key Differences
Core Concepts of GraphQL
1. Schema & Types
GraphQL APIs are built on schemas that define the data structure.
Example schema:graphqltype User { id: ID! name: String! email: String! }type Query { getUser(id: ID!): User }
2. Queries
Clients use queries to request specific data.graphqlquery { getUser(id: "123") { name email } }
3. Mutations
Used to modify data (Create, Update, Delete).graphqlmutation { createUser(name: "John Doe", email: "[email protected]") { id name } }
4. Subscriptions
Enable real-time updates using Web Sockets.graphqlsubscription { newUser { id name } }
Setting Up GraphQL in a Full Stack Application
Backend: Implementing GraphQL with Node.js and Express
GraphQL servers can be built using Apollo Server, Express-GraphQL, or other libraries.
Example setup with Apollo Server:javascriptimport { ApolloServer, gql } from "apollo-server"; const typeDefs = gql` type Query { hello: String } `;const resolvers = { Query: { hello: () => "Hello, GraphQL!", }, };const server = new ApolloServer({ typeDefs, resolvers });server.listen().then(({ url }) => { console.log(`Server running at ${url}`); });
Frontend: Querying GraphQL with React and Apollo Client
Example React component using Apollo Client:javascriptimport { useQuery, gql } from "@apollo/client";const GET_USER = gql` query { getUser(id: "123") { name email } } `;function User() { const { loading, error, data } = useQuery(GET_USER); if (loading) return <p>Loading...</p>; if (error) return <p>Error: {error.message}</p>; return <div>{data.getUser.name} - {data.getUser.email}</div>; }
GraphQL Best Practices for Full Stack Development
Use Batching and Caching: Tools like Apollo Client optimize performance.
Secure the API: Implement authentication and authorization.
Optimize Resolvers: Use DataLoader to prevent N+1 query problems.
Enable Rate Limiting: Prevent abuse and excessive API calls.
Conclusion
GraphQL provides a powerful and efficient way to manage data fetching in full-stack applications. By using GraphQL, developers can optimize API performance, reduce unnecessary data transfer, and create a more flexible architecture.
Whether you’re working with React, Angular, Vue, or any backend framework, GraphQL offers a modern alternative to traditional REST APIs.
WEBSITE: https://www.ficusoft.in/full-stack-developer-course-in-chennai/
0 notes
Text
Build a GraphQL API with Node.js and Express: A Step-by-Step Guide
Introduction Building a GraphQL API with Node.js and Express is a crucial skill for any modern developer, as it allows for flexible and efficient data querying and management. In this comprehensive, hands-on tutorial, we will guide you through the process of creating a fully-fledged GraphQL API using Node.js, Express, and the Apollo Server framework. What You’ll Learn By the end of this…
0 notes
Text
GraphQL - Learn Step by Step
Setting Up GraphQL Step by Step Install Node.js and npm: Ensure you have Node.js and npm installed. Check by running node -v npm -v Initialize a Node.js Project: Create a new directory and initialize a Node.js project mkdir graphql-server cd graphql-server npm init -y Install Required Packages: Install GraphQL, Express, and Apollo Server npm install express apollo-server-express…
0 notes
Text
Understanding and Implementing GraphQL in Mobile Apps
In the dynamic world of mobile app development, integrating robust and efficient APIs is crucial. GraphQL, an open-source data query language developed by Facebook, has emerged as a powerful tool for developers. Unlike traditional REST APIs, GraphQL allows clients to request exactly the data they need, minimizing over-fetching and under-fetching of data. If you're looking to enhance your mobile app development, especially if you're a mobile app development company in Chennai, understanding and implementing GraphQL can provide significant advantages.
Why Choose GraphQL for Mobile Apps
GraphQL’s query language enables clients to fetch only the necessary data, reducing the amount of data transferred over the network. This efficiency is especially beneficial for mobile apps, which often operate on limited bandwidth.
Enhanced Performance
By avoiding multiple round trips to the server, GraphQL improves the performance of your mobile apps. The single request and response structure streamlines data retrieval, enhancing user experience with faster load times.
Strongly Typed Schema
GraphQL uses a strongly typed schema, which helps in defining the structure of the data queries and responses. This schema ensures that both the client and server understand the data format, reducing errors and increasing reliability.
Implementing GraphQL in Mobile Apps
Set Up the Server: Install a GraphQL server. You can use popular libraries like Apollo Server or Express-GraphQL.
Define the Schema: Create your schema by defining the types and the queries your app will support.
Resolvers: Implement resolver functions for your queries to fetch the necessary data from your database or other APIs.
Client Integration: Use a GraphQL client, such as Apollo Client or Relay, to connect your mobile app to the GraphQL server.
Practical Steps
Start by setting up a GraphQL server using tools like Apollo Server or Express-GraphQL. These libraries provide the essential infrastructure for handling GraphQL queries and mutations.
Step 2: Define Your Schema
Define the schema for your API. The schema outlines the types of data and the queries and mutations that your clients can perform. This step is crucial for setting the foundation of your GraphQL implementation.
Step 3: Create Resolvers
Resolvers are functions that handle the data fetching for your queries and mutations. Implement these resolvers to connect your schema to your data sources, whether it's a database, REST API, or other services.
Step 4: Integrate the Client
Finally, integrate a GraphQL client into your mobile app. Apollo Client and Relay are popular choices that provide powerful tools for managing GraphQL queries and state in your app.
Advantages of Using GraphQL
GraphQL simplifies data management by allowing clients to request exactly what they need. This capability reduces the complexity of handling multiple endpoints, making it easier to manage and scale your API.
Real-Time Data with Subscriptions
GraphQL supports real-time data through subscriptions. Subscriptions enable clients to receive updates whenever specific data changes, which is particularly useful for features like notifications or live updates in your mobile app.
Increased Developer Productivity
GraphQL enhances developer productivity by providing a more flexible and efficient way to interact with APIs. The strongly typed schema and powerful query language enable faster development cycles and easier debugging.
Key Considerations
Implement proper security measures when using GraphQL. Ensure that your queries and mutations are properly authenticated and authorized to prevent unauthorized access to sensitive data.
Performance Optimization
Optimize your GraphQL server for performance. Implement caching strategies and use batching techniques to minimize the load on your server and improve response times.
Understanding and implementing GraphQL in mobile apps can significantly enhance the efficiency and performance of your applications. Whether you're a mobile app development company in Chennai or a solo developer, leveraging GraphQL can streamline your data fetching processes and provide a better user experience. For professional assistance in implementing GraphQL and developing high-performance mobile apps, contact Creatah today. Let us help you take your mobile app to the next level!
Contact Creatah now to get started on your next mobile app project!
0 notes
Video
youtube
Published on YouTube: React, GraphQL, MongoDB and Apollo Server | Create a Todo App #1 Create an Express Server https://www.youtube.com/watch?v=WkhfTCrBU1E
0 notes
Text
Solus Orbis - The guts
This project is going to take a serious amount of time. That’s totally okay, of course, but I thought it might be worthwhile to document some of the process here! In today’s post, I’m going to talk about ‘the guts’ of Solus Orbis. Essentially, what languages I’m currently using to create it.
Laravel: Before my present job, I had been teaching myself Laravel in order to create a project management for the job I was in at the time. Now, at my present job, one of our client’s site’s has Laravel as part of its infrastructure. I’m familiar with Vue most, but also some of Angular and React; however, since these are compiled, this didn’t quite work for user created skins and templates. I’d want to use PHP for its get/put file contents functions. I wanted to use a framework in order to ease right into a good structure and flow, so I debated between Symfony and Laravel. Ultimately, I decided to go the route of Laravel because of my familiarity with it.
The Data: Before even diving into this project, I knew that I wanted to have a ‘server’ and ‘client’ separation. As a MySQL nerd, that was my database of choice (MongoDB being a close second). MySQL ultimately won for relation purposes. As a JavaScript nerd, I chose ExpressJS for my server. After some further digging into what and how I wanted to do this, I decided to learn GraphQL. The sole purpose of Solus Orbis is to increase my programming skills with the hopes that it can be an asset to the RPG community, so there’s really no rational to some of my choices. (Maybe this will come back to haunt me.) Regardless, I’ve continued down the GraphQL path with an Apollo/Express combination.
My two weaknesses are security and deployment. I know to hash passwords and to watch out for XSS attacks, but there’s so much more out there. I’m also no devops fan. Kubernetes, docker... I’m vaguely familiar, but it’s still a mystery to me. HOW WILL I EVER GO FROM LOCAL TO A GLOBALLY ACCESSIBLE SITE? SEND HELP!
My level of progress is substantial, but there’s still so much to figure out and do. It’s incredibly exciting and challenging, so I’m loving every minute of it. If there are any specific updates that you’d like to see, or any other content, let me know! :)
Don’t forget to join the Solus Orbis discord server!
5 notes
·
View notes
Text
Nodejs rest api

#Nodejs rest api full
At last you will learn to build serverless application using Node.js.
#Nodejs rest api full
Based on Apollo, our GraphQL plugin offers a full compatibility with the whole GraphQL. Later you will learn to test and verify API using Postman and set up API Gateway for the Rest API. You can use a standard RESTful API or GraphQL to query your content. It revolves around resource where every component is a resource and a resource is accessed by a common interface using HTTP standard methods. REST is web standards based architecture and uses HTTP Protocol. In this course, you will learn to set up Node.js, learn about important modules in Node.js, Events with Event loop and Event Emitter, Streams and stream pipes, after node you will learn about Express and Creating Rest API using express with both MySQL and MongoDB. Node.js - RESTful API Advertisements Previous Page Next Page What is REST architecture REST stands for REpresentational State Transfer. At last creating and deploying serverless project on AWS Lambda. Integrating Gateway to route the request and keep track of everything. STEP-1: Create a separate folder and with the help of a terminal or command prompt navigate to this folder: STEP-2: Create package.json by typing the following command in the terminal: npm init -y. Postman is an API testing tool and gives wide support for all possible HTTP methods. It will show the installed version of NodeJs to our system as shown in the below screenshot. Create and configure middleware to add things like logging, authentication and authorization, and other web. Express is a node.js web application framework and MySQL, MongoDB are databases used to manage data. A RESTful API is an Application Programming Interface (API) that uses HTTP verbs like GET, PUT, POST, and DELETE to operate data. Use Express for Node.js to build RESTful APIs. In this course, you will set up Node.js and create Rest API using express with both MySQL and MongoDB and test it using Postman. For now, let’s start creating our secure REST API using Node.js In this tutorial, we are going to create a pretty common (and very practical) REST API for a resource called users. Node.js uses an event-driven, non-blocking I/O model that makes it lightweight and efficient, perfect for data-intensive real-time applications that run across distributed devices. It is used for building fast and scalable network applications. Node.js is a server-side platform built on Google Chrome's JavaScript Engine. If you are going to create the routes in a simple and easy manner with out much understanding much about node js framework, you can go with Express JS.
0 notes
Text
JavaScript Template Literals Explained
In contrast to ES5 and earlier, the new ES2015/ES6 feature known as Template Literals enables you to work with strings in a novel manner. A template literals is a special kind of string literal that allows us to embed expressions within them. This makes it possible to dynamically generate text based on data values. It is similar to using an inline function call with the function keyword. At first appearance, the syntax appears to be fairly straightforward; simply use backticks in place of single or double quotes: const a_string = `something` They stand out because they offer many characteristics that standard strings constructed with quotations do not, namely: - They provide a fantastic syntax for defining multiline strings. - They offer a simple method for interpolating variables and expressions in strings. - They enable the creation of DSLs with template tags (DSL stands for domain specific language; for instance, Styled Components in React utilise it to define CSS for a component). Let's examine each of these in more depth.
Multiline strings
Before ES6, you had to use the character at the end of a line to generate a string that covered two lines: const string = 'first part second part' This enables a string to be created on two lines, although it is only displayed on one line: first part second part You need to manually put n at the end of each line to render the string on several lines as well, as in the following example: const string = 'first linen' + 'second line' Multiline strings are significantly easier when using template literals. In order to add a new line to a template literal after it has been opened using the backtick, simply hit enter without using any special characters. const string = `Hey this string is awesome!` Remembering that space has significance, do the following: const string = `First Second` will result in a string that looks like this: First Second Having an empty first line and adding the trim() method directly after the closing backtick, which will remove any space before the first character, is a simple remedy for this issue: const string = ` First Second`.trim()
Interpolation
It is simple to interpolate variables and expressions into strings using template literals. The ${…} syntax is used to accomplish this: const myVariable = 'test' const string = `something ${myVariable}` //something test You can include anything, including expressions, inside the ${} symbol: const string = `something ${1 + 2 + 3}` const string2 = `something ${doSomething() ? 'x' : 'y'}`
Template tags
One feature that may seem less useful to you at first is tagged templates, but it's actually utilised by several widely used libraries, like Styled Components and Apollo, the GraphQL client/server library, so it's crucial to grasp how it functions. In Styled Components, CSS strings are defined using template tags: const Button = styled.button` font-size: 1.5em; background-color: black; color: white; ` A GraphQL query schema in Apollo is defined by template tags: const query = gql` query { ... } ` The gql template tag and styled.button tags that are highlighted in those examples are merely functions: function gql(literals, ...expressions) {} This function outputs a string that can represent the outcome of any calculation. The content of the template literals tokenized by the interpolations of the expressions are contained in the array literals. All interpolations are contained in expressions. let's take and above example : const string = `something ${1 + 2 + 3}` literals is a two-item array. The first is something, the string up until the first interpolation, and the second is nothing, the space between the first interpolation's finish (there is only one) and the string's conclusion. expressions in this instance are a single item array with the value 6. One that is more intricate is: const string = `something another ${'x'} new line ${1 + 2 + 3} test` Here, literals is an array with the following initial item: ;`something another ` the second is: ;` new line ` and the third is: ;` test` expressions in this instance consist of a two-item array, x and 6. The power of this type of feature lies in the fact that the function to which those values are supplied can do anything with them. The simplest illustration is to combine literals and expressions to mimic what the string interpolation does: const interpolated = interpolate`I paid ${10}€` likewise, here's how interpolation functions: function interpolate(literals, ...expressions) { let string = `` for (const of expressions.entries()) { string += literals + val } string += literals return string } We hope that you found these tips helpful! We’d love to hear what you think about them. Please leave any comments below or contact us directly at Read the full article
0 notes
Text
GraphQL: Learn Basic GraphQL with Node JS and MongoDB
GraphQL: Learn Basic GraphQL with Node JS and MongoDB
You will learn the following things in the course: Learn GraphQL API with Apollo Server in Node.js, Express, and MongoDB. More and more teams are choosing GraphQL instead of (or along with) REST for their web APIs. GraphQL queries give clients great flexibility in the way they request data from the server, preventing issues such as fetching or under fetching of data, and allowing multiple…

View On WordPress
0 notes
Text
The Strength and Beauty of GraphQL in Use

The Strength and Beauty of GraphQL in Use
Facebook developed GraphQL as a major problem-solver for more efficient mobile data loading in 2012 and released it as an open-source solution three years later. Since that time, it mistakenly associates with PHP only and lacks trust given the Facebook's reputation (if you know what I mean). However, a recent Netflix case that finds GraphQL as a game-changer to power the API layer and increase the scalability and operability of the studio ecosystem attracts attention. This specification already gained popularity — given State of JavaScript 2019 Report, 50.6% of respondents have heard of GraphQL and would like to learn it. However, The New York Times, Airbnb, Atlassian, Coursera, NBC, GitHub, Shopify, and Starbucks are already among the GraphQL users. We decided to dwell on the beauty, strength, and some constructions of GraphQL in its scalability, performance, and security aspects and tell about our use cases for a banking sphere and a platform of commercial targeting. See the list of useful toolkits added in the end as a bonus.
GraphQL: the Beans Spilled
GraphQL is a convenient way of communication between a client and a server first. Sometimes one can see it as an opponent to REST API given the main difference that GraphQL brings to the table — only endpoint to fetch the data by one call from multiple sources. Meanwhile, we are to provide the space for consideration whether this specification is relevant to particular tasks or REST API is the silver bullet for your case.
Both REST and GraphQL APIs are stateless, supported by any server-side language and any frontend framework, exchange the data through the JSON. But the one and the only endpoint containing the query expression to define the data that should be returned creates the what-you-see-is-what-you-get principle to optimize the work. Let's deep dive into the specification's main advantages and disadvantages.
Performance and Security
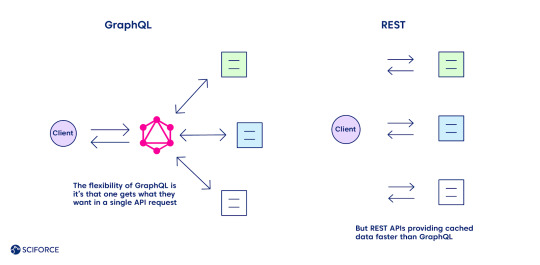
The flexibility of GraphQL is its main advantage over REST, as one gets what they want in a single API request. Define the structure of the information to receive back, and it goes back in the format requested, no under-fetching or over-fetching.
Meanwhile, caching seems to be one of the GraphQL downsides compared to REST (see the complete list of all the pros and cons further). REST APIs use the HTTP caching mechanism, providing cached data faster. It leverages its community-powered and time-tested feature, leaving GraphQL behind at the moment.
Security is another area of improvement for GraphQL while comparing it with REST, which boasts of a more mature system. The latter leverages HTTP authentication, JSON Web Tokens (JWT), or OAUth 2.0 mechanisms.
Pros and Cons: All Things Considered
Unlike REST API, GraphQL has detailed documentation and supports the function of nested queries that contributes to the principle "no over fetching and under fetching data," which happened while using the first specification. Query and mutation are the joint GraphQL operations. Thus, the CRUD (create, read, update, delete) model is not relevant for GraphQL as the create operation executes through the query command (other ones are implemented with mutations).
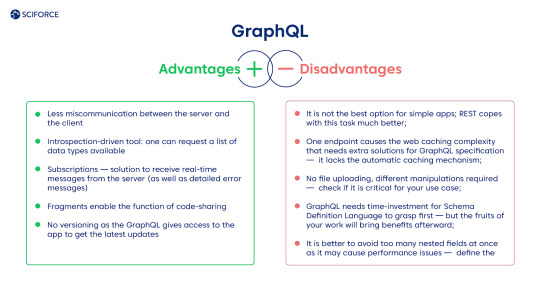
Advantages
Less miscommunication between the server and the client.
Introspection-driven tool: one can request a list of data types available.
Subscriptions — solution to receive real-time messages from the server (as well as detailed error messages).
Fragments enable the function of code-sharing.
No versioning as the GraphQL gives access to the app to get the latest updates.
Disadvantages
It is not the best option for simple apps; REST copes with this task much better.
One endpoint causes the web caching complexity that needs extra solutions for GraphQL specification — it lacks the automatic caching mechanism.
No file uploading, different manipulations required — check if it is critical for your use case.
GraphQL needs time-investment for Schema Definition Language to grasp first — but the fruits of your work will bring benefits afterward.
It is better to avoid too many nested fields at once as it may cause performance issues — define the architecture of the query beforehand.
Our Use Cases with GraphQL
GraphQL provides developers with higher scalability of the system that applies in any sphere. We want to share our experience of functions diversification for a commercial targeting platform and solving the banking application's two-fold task.
The Platform for a Commercial Targeting
GraphQL became a convenient solution for one of our clients who needed to develop a platform for commercial targeting, providing a straightforward approach for searching the potential customers in any national institution or facility. Using it, the client can direct the ads straight to the audience of interest using geolocation data and a set of filters. The platform consists of two primary services: one for geo-based consumers extraction based on PlaceIQ dataset usage and one for attribute-based (consumers identity graph) with consumer dataset. The project can be extended by adding the missing residential dataset to retrieve residents at requested addresses. Also, the services could be wrapped into the REST API to provide the ability to trigger them using web requests.
Risk Reduction and Resilience Boosting Financial Platform
An average bank encounters no more than 100K transactions a day. Moreover, it also faces malicious actions and the risk of cyberattack. One of our clients needed to empower their software platform to encounter higher transaction pressure and provide a higher risk-management system to avoid financial crimes. As a result, we have developed a solution that stands for the high amount of transactions and provides the reports while detecting anomalies based on the transactions' data in real-time.
GraphQL: Useful Toolkit
Check out the growing GraphQL community to find the latest updates on this solution. There are many horizontally and vertically developed solutions for GraphQL client, GraphQL gateway, GraphQL server, and database-to-GraphQL server. Add some of the tools that you enjoy using while working with GraphQL in comments to this blog.
GraphQL's servers are available for languages like JavaScript, Java, Python, Perl, Ruby, C#, Go, etc.
Apollo Server for JavaScript applications and GraphQL Ruby are some of the most popular choices.
Apollo Client, DataLoader, GraphQL Request, and Relay are among popular GraphQL clients. Graphiql, GraphQL IDE, and GraphQL Playground for IDE's respectively.
Some handy tools:
GraphQL Bindings — to use GraphQL API's as modular buildings blocks
GraphQL Docs — to generate GraphQL documentation in a simple way
GraphCMS — GraphQL-based CMS
GraphQL Network for easy debugging
GraphQL Voyager — to visualize data relations
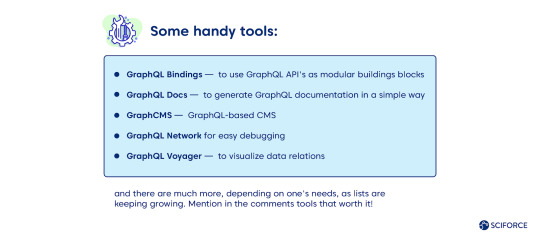
and there are much more, depending on one's needs, as lists are keeping growing. Mention in the comments tools that worth it!
0 notes
Text
Building Real-Time GraphQL APIs with Express and Apollo
Building Real-Time GraphQL APIs with Express and Apollo Introduction Building real-time GraphQL APIs has become a crucial aspect of modern web development, enabling efficient communication between clients and servers through a single query language. In this comprehensive tutorial, we’ll explore how to build real-time GraphQL APIs using Express.js and Apollo Server. What You’ll Learn By the…
0 notes
Text
Let’s Create Our Own Authentication API with Nodejs and GraphQL
Authentication is one of the most challenging tasks for developers just starting with GraphQL. There are a lot of technical considerations, including what ORM would be easy to set up, how to generate secure tokens and hash passwords, and even what HTTP library to use and how to use it.
In this article, we’ll focus on local authentication. It’s perhaps the most popular way of handling authentication in modern websites and does so by requesting the user’s email and password (as opposed to, say, using Google auth.)
Moreover, This article uses Apollo Server 2, JSON Web Tokens (JWT), and Sequelize ORM to build an authentication API with Node.
Handling authentication
As in, a log in system:
Authentication identifies or verifies a user.
Authorization is validating the routes (or parts of the app) the authenticated user can have access to.
The flow for implementing this is:
The user registers using password and email
The user’s credentials are stored in a database
The user is redirected to the login when registration is completed
The user is granted access to specific resources when authenticated
The user’s state is stored in any one of the browser storage mediums (e.g. localStorage, cookies, session) or JWT.
Pre-requisites
Before we dive into the implementation, here are a few things you’ll need to follow along.
Node 6 or higher
Yarn (recommended) or NPM
GraphQL Playground
Basic Knowledge of GraphQL and Node
…an inquisitive mind!
Dependencies
This is a big list, so let’s get into it:
Apollo Server: An open-source GraphQL server that is compatible with any kind of GraphQL client. We won’t be using Express for our server in this project. Instead, we will use the power of Apollo Server to expose our GraphQL API.
bcryptjs: We want to hash the user passwords in our database. That’s why we will use bcrypt. It relies on Web Crypto API‘s getRandomValues interface to obtain secure random numbers.
dotenv: We will use dotenv to load environment variables from our .env file.
jsonwebtoken: Once the user is logged in, each subsequent request will include the JWT, allowing the user to access routes, services, and resources that are permitted with that token. jsonwebtokenwill be used to generate a JWT which will be used to authenticate users.
nodemon: A tool that helps develop Node-based applications by automatically restarting the node application when changes in the directory are detected. We don’t want to be closing and starting the server every time there’s a change in our code. Nodemon inspects changes every time in our app and automatically restarts the server.
mysql2: An SQL client for Node. We need it connect to our SQL server so we can run migrations.
sequelize: Sequelize is a promise-based Node ORM for Postgres, MySQL, MariaDB, SQLite and Microsoft SQL Server. We will use Sequelize to automatically generate our migrations and models.
sequelize cli: We will use Sequelize CLI to run Sequelize commands. Install it globally with yarn add --global sequelize-cli in the terminal.
Setup directory structure and dev environment
Let’s create a brand new project. Create a new folder and this inside of it:
yarn init -y
The -y flag indicates we are selecting yes to all the yarn init questions and using the defaults.
We should also put a package.json file in the folder, so let’s install the project dependencies:
yarn add apollo-server bcrpytjs dotenv jsonwebtoken nodemon sequelize sqlite3
Next, let’s add Babeto our development environment:
yarn add babel-cli babel-preset-env babel-preset-stage-0 --dev
Now, let’s configure Babel. Run touch .babelrc in the terminal. That creates and opens a Babel config file and, in it, we’ll add this:
{ "presets": ["env", "stage-0"] }
It would also be nice if our server starts up and migrates data as well. We can automate that by updating package.json with this:
"scripts": { "migrate": " sequelize db:migrate", "dev": "nodemon src/server --exec babel-node -e js", "start": "node src/server", "test": "echo \"Error: no test specified\" && exit 1" },
Here’s our package.json file in its entirety at this point:
{ "name": "graphql-auth", "version": "1.0.0", "main": "index.js", "scripts": { "migrate": " sequelize db:migrate", "dev": "nodemon src/server --exec babel-node -e js", "start": "node src/server", "test": "echo \"Error: no test specified\" && exit 1" }, "dependencies": { "apollo-server": "^2.17.0", "bcryptjs": "^2.4.3", "dotenv": "^8.2.0", "jsonwebtoken": "^8.5.1", "nodemon": "^2.0.4", "sequelize": "^6.3.5", "sqlite3": "^5.0.0" }, "devDependencies": { "babel-cli": "^6.26.0", "babel-preset-env": "^1.7.0", "babel-preset-stage-0": "^6.24.1" } }
Now that our development environment is set up, let’s turn to the database where we’ll be storing things.
Database setup
We will be using MySQL as our database and Sequelize ORM for our relationships. Run sequelize init (assuming you installed it globally earlier). The command should create three folders: /config /models and /migrations. At this point, our project directory structure is shaping up.
Let’s configure our database. First, create a .env file in the project root directory and paste this:
NODE_ENV=development DB_HOST=localhost DB_USERNAME= DB_PASSWORD= DB_NAME=
Then go to the /config folder we just created and rename the config.json file in there to config.js. Then, drop this code in there:
require('dotenv').config() const dbDetails = { username: process.env.DB_USERNAME, password: process.env.DB_PASSWORD, database: process.env.DB_NAME, host: process.env.DB_HOST, dialect: 'mysql' } module.exports = { development: dbDetails, production: dbDetails }
Here we are reading the database details we set in our .env file. process.env is a global variable injected by Node and it’s used to represent the current state of the system environment.
Let’s update our database details with the appropriate data. Open the SQL database and create a table called graphql_auth. I use Laragon as my local server and phpmyadmin to manage database tables.
What ever you use, we’ll want to update the .env file with the latest information:
NODE_ENV=development DB_HOST=localhost DB_USERNAME=graphql_auth DB_PASSWORD= DB_NAME=<your_db_username_here>
Let’s configure Sequelize. Create a .sequelizerc file in the project’s root and paste this:
const path = require('path')
module.exports = { config: path.resolve('config', 'config.js') }
Now let’s integrate our config into the models. Go to the index.js in the /models folder and edit the config variable.
const config = require(__dirname + '/../../config/config.js')[env]
Finally, let’s write our model. For this project, we need a User model. Let’s use Sequelize to auto-generate the model. Here’s what we need to run in the terminal to set that up:
sequelize model:generate --name User --attributes username:string,email:string,password:string
Let’s edit the model that creates for us. Go to user.js in the /models folder and paste this:
'use strict'; module.exports = (sequelize, DataTypes) => { const User = sequelize.define('User', { username: { type: DataTypes.STRING, }, email: { type: DataTypes.STRING, }, password: { type: DataTypes.STRING, } }, {}); return User; };
Here, we created attributes and fields for username, email and password. Let’s run a migration to keep track of changes in our schema:
yarn migrate
Let’s now write the schema and resolvers.
Integrate schema and resolvers with the GraphQL server
In this section, we’ll define our schema, write resolver functions and expose them on our server.
The schema
In the src folder, create a new folder called /schema and create a file called schema.js. Paste in the following code:
const { gql } = require('apollo-server') const typeDefs = gql` type User { id: Int! username: String email: String! } type AuthPayload { token: String! user: User! } type Query { user(id: Int!): User allUsers: [User!]! me: User } type Mutation { registerUser(username: String, email: String!, password: String!): AuthPayload! login (email: String!, password: String!): AuthPayload! } ` module.exports = typeDefs
Here we’ve imported graphql-tag from apollo-server. Apollo Server requires wrapping our schema with gql.
The resolvers
In the src folder, create a new folder called /resolvers and create a file in it called resolver.js. Paste in the following code:
const bcrypt = require('bcryptjs') const jsonwebtoken = require('jsonwebtoken') const models = require('../models') require('dotenv').config() const resolvers = { Query: { async me(_, args, { user }) { if(!user) throw new Error('You are not authenticated') return await models.User.findByPk(user.id) }, async user(root, { id }, { user }) { try { if(!user) throw new Error('You are not authenticated!') return models.User.findByPk(id) } catch (error) { throw new Error(error.message) } }, async allUsers(root, args, { user }) { try { if (!user) throw new Error('You are not authenticated!') return models.User.findAll() } catch (error) { throw new Error(error.message) } } }, Mutation: { async registerUser(root, { username, email, password }) { try { const user = await models.User.create({ username, email, password: await bcrypt.hash(password, 10) }) const token = jsonwebtoken.sign( { id: user.id, email: user.email}, process.env.JWT_SECRET, { expiresIn: '1y' } ) return { token, id: user.id, username: user.username, email: user.email, message: "Authentication succesfull" } } catch (error) { throw new Error(error.message) } }, async login(_, { email, password }) { try { const user = await models.User.findOne({ where: { email }}) if (!user) { throw new Error('No user with that email') } const isValid = await bcrypt.compare(password, user.password) if (!isValid) { throw new Error('Incorrect password') } // return jwt const token = jsonwebtoken.sign( { id: user.id, email: user.email}, process.env.JWT_SECRET, { expiresIn: '1d'} ) return { token, user } } catch (error) { throw new Error(error.message) } } },
} module.exports = resolvers
That’s a lot of code, so let’s see what’s happening in there.
First we imported our models, bcrypt and jsonwebtoken, and then initialized our environmental variables.
Next are the resolver functions. In the query resolver, we have three functions (me, user and allUsers):
me query fetches the details of the currently loggedIn user. It accepts a user object as the context argument. The context is used to provide access to our database which is used to load the data for a user by the ID provided as an argument in the query.
user query fetches the details of a user based on their ID. It accepts id as the context argument and a user object.
alluser query returns the details of all the users.
user would be an object if the user state is loggedIn and it would be null, if the user is not. We would create this user in our mutations.
In the mutation resolver, we have two functions (registerUser and loginUser):
registerUser accepts the username, email and password of the user and creates a new row with these fields in our database. It’s important to note that we used the bcryptjs package to hash the users password with bcrypt.hash(password, 10). jsonwebtoken.sign synchronously signs the given payload into a JSON Web Token string (in this case the user id and email). Finally, registerUser returns the JWT string and user profile if successful and returns an error message if something goes wrong.
login accepts email and password , and checks if these details match with the one that was supplied. First, we check if the email value already exists somewhere in the user database.
models.User.findOne({ where: { email }}) if (!user) { throw new Error('No user with that email') }
Then, we use bcrypt’s bcrypt.compare method to check if the password matches.
const isValid = await bcrypt.compare(password, user.password) if (!isValid) { throw new Error('Incorrect password') }
Then, just like we did previously in registerUser, we use jsonwebtoken.sign to generate a JWT string. The login mutation returns the token and user object.
Now let’s add the JWT_SECRET to our .env file.
JWT_SECRET=somereallylongsecret
The server
Finally, the server! Create a server.js in the project’s root folder and paste this:
const { ApolloServer } = require('apollo-server') const jwt = require('jsonwebtoken') const typeDefs = require('./schema/schema') const resolvers = require('./resolvers/resolvers') require('dotenv').config() const { JWT_SECRET, PORT } = process.env const getUser = token => { try { if (token) { return jwt.verify(token, JWT_SECRET) } return null } catch (error) { return null } } const server = new ApolloServer({ typeDefs, resolvers, context: ({ req }) => { const token = req.get('Authorization') || '' return { user: getUser(token.replace('Bearer', ''))} }, introspection: true, playground: true }) server.listen({ port: process.env.PORT || 4000 }).then(({ url }) => { console.log(`🚀 Server ready at ${url}`); });
Here, we import the schema, resolvers and jwt, and initialize our environment variables. First, we verify the JWT token with verify. jwt.verify accepts the token and the JWT secret as parameters.
Next, we create our server with an ApolloServer instance that accepts typeDefs and resolvers.
We have a server! Let’s start it up by running yarn dev in the terminal.
Testing the API
Let’s now test the GraphQL API with GraphQL Playground. We should be able to register, login and view all users — including a single user — by ID.
We’ll start by opening up the GraphQL Playground app or just open localhost://4000 in the browser to access it.
Mutation for register user
mutation { registerUser(username: "Wizzy", email: "[email protected]", password: "wizzyekpot" ){ token } }
We should get something like this:
{ "data": { "registerUser": { "token": "eyJhbGciOiJIUzI1NiIsInR5cCI6IkpXVCJ9.eyJpZCI6MTUsImVtYWlsIjoiZWtwb3RAZ21haWwuY29tIiwiaWF0IjoxNTk5MjQwMzAwLCJleHAiOjE2MzA3OTc5MDB9.gmeynGR9Zwng8cIJR75Qrob9bovnRQT242n6vfBt5PY" } } }
Mutation for login
Let’s now log in with the user details we just created:
mutation { login(email:"[email protected]" password:"wizzyekpot"){ token } }
We should get something like this:
{ "data": { "login": { "token": "eyJhbGciOiJIUzI1NiIsInR5cCI6IkpXVCJ9.eyJpZCI6MTUsImVtYWlsIjoiZWtwb3RAZ21haWwuY29tIiwiaWF0IjoxNTk5MjQwMzcwLCJleHAiOjE1OTkzMjY3NzB9.PDiBKyq58nWxlgTOQYzbtKJ-HkzxemVppLA5nBdm4nc" } } }
Awesome!
Query for a single user
For us to query a single user, we need to pass the user token as authorization header. Go to the HTTP Headers tab.
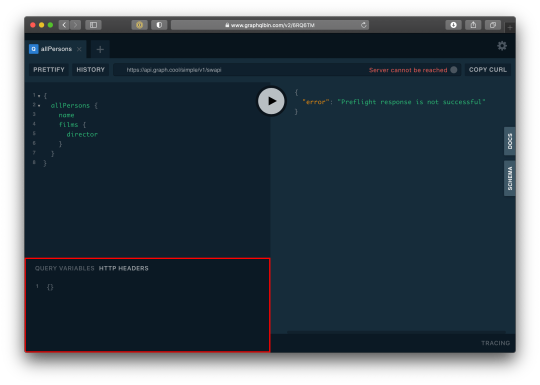
…and paste this:
{ "Authorization": "eyJhbGciOiJIUzI1NiIsInR5cCI6IkpXVCJ9.eyJpZCI6MTUsImVtYWlsIjoiZWtwb3RAZ21haWwuY29tIiwiaWF0IjoxNTk5MjQwMzcwLCJleHAiOjE1OTkzMjY3NzB9.PDiBKyq58nWxlgTOQYzbtKJ-HkzxemVppLA5nBdm4nc" }
Here’s the query:
query myself{ me { id email username } }
And we should get something like this:
{ "data": { "me": { "id": 15, "email": "[email protected]", "username": "Wizzy" } } }
Great! Let’s now get a user by ID:
query singleUser{ user(id:15){ id email username } }
And here’s the query to get all users:
{ allUsers{ id username email } }
Summary
Authentication is one of the toughest tasks when it comes to building websites that require it. GraphQL enabled us to build an entire Authentication API with just one endpoint. Sequelize ORM makes creating relationships with our SQL database so easy, we barely had to worry about our models. It’s also remarkable that we didn’t require a HTTP server library (like Express) and use Apollo GraphQL as middleware. Apollo Server 2, now enables us to create our own library-independent GraphQL servers!
Check out the source code for this tutorial on GitHub.
The post Let’s Create Our Own Authentication API with Nodejs and GraphQL appeared first on CSS-Tricks.
You can support CSS-Tricks by being an MVP Supporter.
Let’s Create Our Own Authentication API with Nodejs and GraphQL published first on https://deskbysnafu.tumblr.com/
0 notes
Link
キーポイント WebAssembly has perhaps been the most talked about trend on the web since our last report. Applications for WebAssembly have moved beyond the browser via WASI, and WebAssembly reached a stable 1.0 W3C Recommendation in late 2019. We have thus promoted WebAssembly to Early Adopters status. The annual ECMAScript release, ES2020, is approaching with the greatest number of new language features since ES2015, including optional chaining, BigInt, globalThis, nullish coalescing, and dynamic import. All of these features are considered stable with at least two working browser implementations. Web components have moved from early adopter to early majority status. Web components have reached mainstream maturity and are now supported natively in Chrome, Firefox, Safari, and other browsers based on these browser engines such as Edge and Brave TypeScript has graduated to late majority status. TypeScript is by far the most widely adopted JavaScript variant, has made substantial progress over the past few years, and a majority of JavaScript frameworks now leverage its tooling and infrastructure. The JavaScript client-side framework and library space is constantly changing, and while React, Vue.js, and Angular have dominated in recent years, a new wave of leaner frameworks and application compilers may change the status quo over the next few years. 原文(投稿日:2020/03/12)へのリンク InfoQでは、定期的にトピックグラフを更新して、さまざまなトピックがテクノロジー採用曲線のどこにあると考えるかを示しています。その際、ネットワーク内や会合、会議、アナリストイベントなどで聞いた実践状況、新たなアイデアや事柄を考察します。また、サイトのトラフィックパターンやQConや他の業界カンファレンスなどのセッションへの出席者数も考慮します。 トピックがグラフの右側にある場合は、おそらくInfoQの既存のコンテンツを多く見つけるでしょう。 – InfoQは新しいうちにそれをカバーしています。また、イノベーターとアーリーアダプタが学んだ教訓は、個人、チーム、組織がこれらのアイデアや実践を採用するときに、ガイドとして利用できます。 曲線の左側のトピックは、イノベーターやアーリーアダプタが使用している現在存在感を増しているトピックであり、InfoQのレポートやコンテンツは、これらのアイデアを読者に届けることに重点を置いており、読者は、今、これらのアイデアを探求すべきか、それともその展開を待つべきかをご自身で���断していただけるようになっています。 レポートは、InfoQ編集チームが現在JavaScript/Web開発スペース内でのテクノロジーの採用と存在感を増しているトレンドをどのように見ているかの概要を提供します。これは、アクティブなソフトウェアエンジニア自身である編集者との広範な内部ディスカッション、外部のパブリックサーベイ結果のレビュー、内部またはプライベートのサーベイおよび分析結果のレビュー、およびWebコンポーネントなどの主要なテクノロジーのブラウザのサポートレベルの確認から形成された意見です。 今月はJavaScriptとWeb開発に注目します。急速に変化するこの業界では、年に1回以上の更新が必要です。これは、2018年の第4四半期にグラフを最後に確認したときのグラフです。 Web Development 2018 Q4 GraphJavaScriptとWebエコシステムがどれほど成長したかを考えると、1つのグラフにすべての領域を表示することはもはや現実的ではありません。その結果、分析を11の主要分野に分割しました。 Web開発 言語 / 標準 / パターン Web開発 クライアントサイドフレームワーク / ライブラリ Webエンジニアのためのサーバサイドプラットフォーム / フレームワーク / データ / API Webエンジニアのためのクラウド パッケージ管理 / バンドル / 最適化 Web開発のテストと自動化 Webエンジニアのためのモバイル / デスクトップ環境とフレームワーク WebエンジニアのためのIoT / ブロックチェーン / 機械学習 WebエンジニアのためのVisualization / XR CSS Web開発 コードエディタとIDE Web開発は私たちにとって常に興味深いものであり、新しいJavaScriptプロジェクトがほぼ毎日開始されています。どれに焦点を当て、どれを無視するかを決定することは、特に困難です。開発者は、日々の開発作業で現在使用していない場合でも、興味深いアプローチから学び、インスピレーションを得ることができます。 Web開発 言語 / 標準 / パターン Language/Standards/Patterns 2020 Q1イノベーター(Innovators) ECMAScriptの年次リリースであるES2020は、オプションのチェーン、BigInt、globalThis、nullish coalescing、動的インポートなど、ES2015以降で最も多くの新しい言語機能に近づいています。これらの機能はすべて、少なくとも2つの有効なブラウザ実装で安定していると見なされます。 PureScriptはTypeScriptの代替言語を提供します。最近のJavaScript 2019の調査では高得点を記録しましたが、近い将来にイノベーターのステータスを超えて進むかどうかについては議論があります。 アーリーアダプタ(Early Adopters) アーリーアダプタを見て、JavaScriptの静的型チェッカーであるFlowと、JavaScriptベースのWebアプリを生成するためのJavaScriptの代替言語であるElmとReasonを引き続き追跡します。TypeScriptの台頭により、Flowの関心と開発は衰えたように見えますが、変化に備えて追跡しています。 前回のレポート以来、WebAssemblyはおそらくWebで最も話題になったトレンドでした。WebAssemblyのアプリケーションはWASIを介してブラウザを超え、WebAssemblyは2019年後半に安定した1.0 W3C勧告に達しました。これにより、WebAssemblyをアーリーアダプタのステータスに昇格させました。 従来のW3Cプロセスに加えて、Web Incubator CG (WICG)は、幅広い新機能と可能な標準を提案し続けています。また、Web Audioは、Webプラットフォームをさまざまなオーディオアプリケーションで実行可能にするために、引き続き注目を集めています。 アーリーマジョリティ(Early Majority) 関数型およびリアクティブプログラミングパターンは、JavaScriptアプリケーションを最も効率的に構築する方法に関する議論を支配し続けています。Vue.jsの創設者であるEvan You氏は、プロジェクトがTypeScriptに切り替えられたとしても、「皮肉にもTypeScriptはクラスを使用するよりもクラスを回避するのに役立つと思います。Vue3は、クラスの使用が0の100%TSコードベースです。」 Webコンポーネントはアーリーアダプタからアーリーマジョリティステータスに移行しました。Webコンポーネントは成熟した主流になり、ネイティブにサポートされるChrome、Firefox、Safari、およびEdgeやBraveのようなこれらのブラウザエンジンに基づくブラウザでサポートされました。多数のフレームワークとライブラリも、Angular、Dojo、Ionic、Stencil、Svelte、Vue.jsなどがWebコンポーネントをネイティブにサポートしています。 ES2019とAMPの2つのアイテムをアーリーマジョリティカテゴリに直接追加しました。 ES2019は、#smooshgate論争、Object.fromEntries、および文字列とオプションのキャッチバインディングに対するいくつかの小さな改善の後に、flatとflatMapメソッドを配列に追加しました。この比較的小さな新しい機能セットは、JavaScript開発者のアーリーマジョリティによって現在使用されています。 AMPは、Webの高速化を目指す代替手段であり、OpenJS Foundationに参加しました。InfoQはこれまでこれを採用することに抵抗し、既存のオープンWeb標準を使用することを好みましたが、AMPは引き続きメディアやニュースWebサイト全体で採用を続けています。 レイトマジョリティ(Late Majority) JavaScriptエコシステムが成熟するにつれ、置き換えられたサインを示さないレイトマジョリティカテゴリーの基盤テクノロジーがあり、ほとんどすべてのJavaScript開発者によって使用されています。 HTML5とES6/2015 - ES2018はレイトマジョリティです。今日、ほぼすべてのWebアプリケーションがこれらの機能を最小ベースラインとして使用しているためです。 TypeScriptもレイトマジョリティステータスに卒業しています。TypeScriptは、これまでで最も広く採用されているJavaScriptバリアントであり、過去数年間で大幅な進歩を遂げており、JavaScriptフレームワークの大部分は現在、そのツールとインフラストラクチャを利用しています。TypeScript自体は、最近のGitHub Octoverseレポートによると、上位10言語の1つであり、JSの現状調査では、TypeScriptが最も広く使用されているJavaScriptバリアントとしてリストされており、調査対象の50%以上がTypeScriptを使用しており、 JavaScriptのスーパーセットについて好意的な意見があります。 ラガード(Laggards) 私たちは、多くのアプリケーションでまだ使用されているが、新しい開発の取り組みには大きな関心を寄せていない、ラガードでレポートを締めくくります。ES5とHTML4に取って代わったのは新しいバージョンですが、ES5とHTML4の基礎となる機能は、JavaScriptとHTMLの最新バージョンに見られる多数の機能で構成されています。 Web開発 クライアントサイドフレームワーク / ライブラリ JavaScriptのクライアントサイドフレームワークとライブラリは常に変化しており、近年はReact、Vue、Angularが主流を占めていますが、よりスリムなフレームワークとアプリケーションコンパイラの新たな波が今後数年間で現状を変える可能性があります。 Client-side frameworks/libraries 2020 Q1イノベーター(Innovators) Vue.js 3はこのレポートの時点では出荷されていませんが、TypeScriptを使用してリライトされるVueは非常に期待されます。 アーリーアダプタ(Early Adopters) Dojoは引き続き、無駄のないTypeScriptファーストのフレームワークを提供するための道を歩んでいます。Dojoは、リアクティブWebアプリケーションを構築する上で非常に現代的な効率的な手法を提供し、TypeScriptと開発者の人間工学を強く取り入れています。DojoはOpenJS Foundationの一部です。 Emberは先頃、新しいコンポーネントモデルとリアクティブシステムを提供するEmber Octaneを発表しました。 LitElementはPolymerの後継で、軽量のWebコンポーネントを作成す���ためのJavaScriptライブラリを提供します。 Aureliaは引き続き忠実なファンを獲得しており、コンポーネントベースのアプリケーションを構築するための環境を作成するための作業を続けています。 Markoは、元々eBayで開始された別のOpenJS Foundationプロジェクトで、リアクティブUIコンポーネントの作成に重点を置いています。 TencentによるOmiは、Webコンポーネント、JSX、および統合ライブラリへのその他のコンポーネントアプローチをサポートするクロスフレームワークコンポーネント作成ライブラリです。 アーリーマジョリティ(Early Majority) アーリーマジョリティカテゴリで3つのプロジェクトがデビューします。 IonicのStencilは、最も人気のあるWebコンポーネント作成フレームワークになり、多くのフレームワークで使用するコンポーネントを作成するためのフレームワークであるOmiに似ています。 Svelteは、HTMLとの連携と、Disappearingフレームワークへのアプローチにより、Reactに代わる人気の高いものになっています。 Preactは、ReactライブラリへのAPIパリティ付きのReactの4 KB未満のgzip圧縮された代替手段です。 レイトマジョリティ(Late Majority) Angularはこのレポートの時点でリリース候補のステータスにあり、レイトマジョリティステータスに移行し、ついに待望のIvyレンダリングエンジンのアップデートが出荷されました。 Vue.js 2はまた、レイトマジョリティステータスに移行し、現在最も広く使用されているJavaScriptフレームワークの1つです。 Reactは依然として最も人気のあるJavaScriptレンダリングライブラリであり、前回のHooksのレポート以降、更新されています。 RxJSは引き続き人気のあるリアクティブ拡張ライブラリであり、Angularエコシステムで広く使用されています。 OpenJS Foundationの一部であるMomentは、日付と時刻の問題を管理するために最も広く使用されているライブラリです。 Lodash(OpenJS Foundation)などのライブラリーの必要性は減り始めていますが、JavaScriptを操作するために広く使用されているライブラリーです。Core-jsは、最新のJavaScriptを操作するために広く使用されているライブラリでもあります。 ラガード(Laggards) Dojo 1.xとAngular 1.xはまだ広くデプロイされていますがメンテナンスモードです。jQueryは、いくつかの改善点��ありますが、ほとんどが新しいHTMLおよびJavaScript機能、またはより本格的なフレームワークに置き換えられています。 Webエンジニアのためのサーバサイドプラットフォーム / フレームワーク / データ / API JavaScriptのサーバサイドエコシステムは、最近多くの関心を集めています。重要な革新の1つは、サーバサイドレンダリング、静的な事前レンダリング、ビルド時のレンダリングに移行し、現在のアプリケーションで使用されているリアクティブプログラミングモデルを変更することなく、クライアントサイドのJavaScriptワークロードを削減することです。 サーバサイドとAPIとクライアントサイドの違いは曖昧であるため、このカテゴリには、静的な生成、データ、状態管理、およびクライアントサイドとサーバサイドの間で共有されることが多いAPIアプローチも含まれます。 Server-side platforms/frameworks/data/APIs 2020 Q1イノベーター(Innovators) Denoは1.0リリース近くです。元のNode.js作成者であるRyan Dahl氏によって作成されたDenoは、Node.jsに代わるTypeScriptの作成に努めています。 Dojoは、ビルド時レンダリングアプローチを追加しました。これにより、アプリケーションのビルド時にNode.js機能を利用できるようになり、静的なサイト生成のためのさまざまな機能が可能になります。他のソリューションと比較して、Dojoのアプローチはコンポーネントレベルで機能し、主要なパターンと機能のブロックを備えた非常に再利用可能なアプローチを提供します。さらに、Dojoストアは、一般的な状態管理パターンのサポートが組み込まれた、予測可能で一貫性のある状態コンテナを提供します。 Hasuraは、GraphQLサーバを作成するためのいくつかのオープンソースオプションの1つです。State of JS 2019 Rising Starsレポートによると、2019年にはHasuraへの関心が大幅に高まりました。 アーリーアダプタ(Early Adopters) 最初にExpressを作成したチームによって開発されたNode.jsフレームワークであるKoaへの関心は、引き続き関心を集めています。 Nuxtは、サーバ側レンダリング、静的サイト生成、または単一ページアプリを提供するVue.jsフレームワークです。 StrapiとStoryblokは、オープンソースのヘッドレスコンテンツ管理システムです。組織が今日のリアクティブ、コンポーネントベースのアーキテクチャで最新のコンテンツ管理オプションを提供しようと努めているため、この分野は大きな関心を集めています。 ApolloはGraphQLの人気のあるオプションであり、もともとMeteorフレームワークから登場しました。 アーリーマジョリティ(Early Majority) Nest.jsはTypeScriptで作成されたNode.jsフレームワークで、フルスタックのTypeScript開発を可能にするためのさまざまなオプションと機能により、人気が急速に高まっています。 Next.jsは、Reactアプリケーションのサーバサイドフレームワークであり、サーバサイドレンダリング、静的サイト生成などをサポートしています。 GatsbyはGraphQLを活用してさまざまなソースからデータを取得し、Reactベースのアプリケーションに効率的なレンダリングオプションを提供します。 FastifyはOpenJS Foundationプロジェクトであり、高性能のNode.js WebフレームワークとしてExpressに代わる新しい選択肢です。 MobXは、採用され続けているReduxの代替の状態管理です。 レイトマジョリティ(Late Majority) Node.jsはサーバサイドでJavaScriptを実行するためにこれまでで最も広く使用されているアプローチであり、Electronのような環境でWebテクノロジーを使用してデスクトップアプリケーションを作成するための基盤でもあります。Node.jsはOpenJS Foundationの一部です。 Expressは現在でも最も広く使用されているNode.js Webフレームワークであり、OpenJS Foundationプロジェクトでもあります。 RESTは依然としてAPIを作成するために最も広く使用されているアプローチですが、GraphQLは、すべてのAPIエンドポイントを事前に定義する代わりに、クエリベースの代替手段として大きく採用されています。組織がAPIへのアプローチでRESTとGraphQLを一緒に活用することも一般的です。 Reduxは、JavaScriptアプリケーションの状態管理に最も広く使用されているアプローチですが、小規模または単純なアプリケーションではあまり使用されていません。 Webエンジニアのためのクラウド Webエンジニアがクラウドベースのアプリケーションを作成および展開するのに役立つ幅広いソリューションが登場しました。 Cloudイノベーター(Innovators) Architectは、サーバレス JavaScript、Python、Rubyアプリケーションの作成をサポートするOpenJS Foundationプロジェクトです。 アーリーアダプタ(Early Adopters) AWS Amplifyは、AWSでモバイルおよびウェブアプリケーションを構築するための開発プラットフォームを提供します。 Netlifyは、Webアプリケーションを迅速に展開するための一般的な選択肢の1つです。 Azure SDK for JavaScriptは、その柔軟なIoTおよびCognitive Services APIにより、主に人気が高まっています。 アーリーマジョリティ(Early Majority) AWS Lambdaは、サーバレスJavaScript関数を実行することで人気が高まり続けています。 Zeit Nowは、静的およびJAMstackデプロイメント、サーバレス機能、およびグローバルCDNとして、Webアプリケーションをデプロイする一般的な方法です。 Google Cloud Functionsは、サーバレスJavaScript関数を実行するためのGoogleクラウドアプローチを提供します。 Googleのもう1つのサービスであるFirebaseは、クラウドベースのモバイルおよびWebインフラストラクチャを提供します。 パッケージ管理 / バンドル / 最適化 バンドル、パッケージ管理、および全体的なアプリケーションの最適化は、JavaScriptおよびWebアプリケーション開発における重要なトピックであり続けます。 Package management/bundling/optimizing 2020 Q1イノベーター(Innovators) pikaは、ESモジュールでサポートされている環境で構築およびデプロイされるJavaScript用のツールを提供することに焦点を当てています。 Entropicは、単一のフェデレーションレジストリではなく、より分散されたパッケージ登録アプローチを備えたnpmの初期段階の代替手段です。 アーリーアダプタ(Early Adopters) Parcelは、ますます人気のあるWebアプリケーションバンドルです。このレポートの時点で、Parcel 2はリリースの準備がほぼ整っています。 webhintは、アクセシビリティ、速度、およびブラウザー間の互換性を改善するためのリンティングツールを補完するOpenJS Foundationプロジェクトです。 アーリーマジョリティ(Early Majority) Prettierは、JavaScript開発でのコードのフォーマットに関するほとんどの議論を終わらせた独断的なコードフォーマッタです。 ESLintは、JavaScriptアプリケーションのエラーとアンチパターンを見つけるための豊富なアプローチを提供する別のOpenJS Foundationプロジェクトです。スタンドアロン製品としてのTSLintは非推奨となり、ESLintの拡張機能になりました。 Esprimaは、抽象構文ツリーの操作を支援するために広く使用されているECMAScriptパーサであり、OpenJS Foundationの一部でもあります。 Yarnは、npmパッケージレジストリを利用するnpmの代替パッケージマネージャです。 Rollupは、Svelteと同じチームメンバによって作成されたESモジュールバンドルです。Rollupはライブラリとモジュールに広く使用されているのに対し、webpackはアプリケーションに一般的に使用されています。 レイトマジョリティ(Late Majority) NPMは、JavaScriptの事実上のパッケージマネージャーおよびレジストリです。npmは2019年にさまざまな論争に直面し、エコシステムは近い将来代替案を探す可能性があります。 webpackは、JavaScriptエコシステムで最も広く使用されているモジュールバンドルおよびコードオプティマイザです。 BabelはJavaScriptトランスパイラを提供し、開発者は開発で新しい言語機能を使用できますが、本番環境では古いバリアントにデプロイできます。Babelは最近、TypeScriptトランスパイレーションも追加しましたが、型チェックを提供しないため、用途が限られています。 Lighthouseは、Googleがアプリケーションコードの品質とパフォーマンスを向上させるために作成した、広く使用されている自動化ツールです。 Web開発のテストと自動化 JavaScriptでテストを作成および実行するための多くのオプションがあります。簡潔にするために、Chai、Sinon、Jasmine、QUnit、Cucumber、および非常に便利で人気のあるテスト機能を提供する他の同様のライブラリの分析を除外しましたが、これらのライブラリおよび他の多くのテストソリューションの進歩を引き続き追跡しています。 Testing and automation 2020 Q1イノベーター(Innovators) Playwrightは、ブラウザの自動化とテストのためのPuppeteerに新しくリリースされた代替手段です。Puppeteerとは異なり、Playwrightはすべての最新のブラウザーレンダリング環境を対象としています。 機械学習ベースのテストは、テストの生成を自動化する新しい分野です。Applitools、SauceLabs、Testim、Sealights、Test.AI、Mabl、ReTest、ReportPortalなど、この問題を解決しようとする企業があり不足しているわけではありません。この分野には明確な正解はありませんが、近い将来に変わると予想されます。Visual AIテストは、従来のビジュアル回帰テストの代替としても登場しています。 アーリーアダプタ(Early Adopters) Appiumは、Seleniumから登場したW3C WebDriverプロトコルを使用した、ネイティブ、ハイブリッド、モバイルのWebアプリ用のテスト自動化フレームワークです。AppiumはOpenJS Foundationプロジェクトです。 Internは、ユニット、機能 (WebDriverを介して、またはPuppeteerやPlayrightのような他の環境で) 、統合、パフォーマンス、およびその他の種類のテスト用にTypeScriptで作成されたOpenJS Foundationプロジェクトです。 Avaは、Node.jsアプリケーションの人気のあるテストランナーです。 WebdriverIOはOpenJS Foundationプロジェクトであり、WebDriverプロトコルに基づく機能および統合テスト環境を提供します。 アーリーマジョリティ(Early Majority) Cypressは、最近FirefoxとEdgeのサポートを追加したChromiumベースのブラウザ内のエンドツーエンドのテストランナーとして急速に人気を博しています。 Storybookは、UIコンポーネントを作成、テスト、共有するためのテストフレームワーク、デザインシステム、開発環境の一部です。 レイトマジョリティ(Late Majority) Jestは、Reactエコシステムによって一般化されたテストフレームワークであり、今日最も広く使用されているテストアサーションライブラリです。 MochaはOpenJS Foundationプロジェクトであり、シンプルで使いやすい単体テストライブラリを提供します。 KarmaとProtractorは、引き続きAngularアプリケーションをテストするための一般的なアプローチです。 Seleniumプロジェクトから生まれたプロトコルであるWebDriverは、ブラウザと対話して完全なテスト自動化を行う最も一般的な方法であり続けます。 PuppeteerはChromiumのみのブラウザオートメーションアプローチであり、Seleniumよりも操作が簡単ですが、機能とサポートされているブラウザーの両方で使用が制限されています。 Webエンジニアのためのモバイル / デスクトップ環境とフレームワーク モバイルおよびデスクトップアプリケーションを構築するためのWebテクノロジーの活用は、人気とオプションの両方で増え続けています。 Mobile/desktop environments and frameworks 2020 Q1イノベーター(Innovators) Ionic CapacitorはCordovaに代わるもので、ハイブリッドアプリケーションの作成でWebテクノロジーとネイティブテクノロジーを活用するタイミングをより細かく制御できます。 アーリーアダプタ(Early Adopters) NativeScriptは、AngularおよびVue.jsアプリケーション用のWebテクノロジーを使用したネイティブアプリケーションのコンパイルを提供します。 アーリーマジョリティ(Early Majority) Ionic 4+は、アプリケーションを構築するためのフレームワークとコンポーネントライブラリを提供します。当初はAngularフレームワークとして開始されましたが、Ionicはフレームワークにとらわれず、Reactおよびその他のフレームワークをサポートしています。 React Nativeを使用すると、開発者はReactアプリケーションにあるWebテクノロジーとパターンを利用してネイティブアプリケーションを作成できます。React Nativeと他の同様のソリューションは、いくつかのシナリオではうまく機能するが、使いこなすのが難しいため、これまでさまざまなレビューが寄せられています。 Electronは、ChromiumとNode.jsを埋め込むことにより、Webテクノロジーを使用してデスクトップアプリケーションを作成するためのOpenJS Foundationプロジェクトです。日常的に使用するSlackなどの多くのアプリケーションは、Electronを活用しています。 レイトマジョリティ(Late Majority) Cordovaは、ハイブリッドモバイルアプリケーションを作成するために広く使用されている環境ですが、近い将来、ラガードになるリスクがあります。 WebエンジニアのためのIoT / ブロックチェーン / 機械学習 IoT、ブロックチェーン、機械学習などの新興分野でのWebテクノロジーのオプションは増え続けています。 IoT/Blockchain/Machine learning 2020 Q1イノベーター(Innovators) ml.jsは、JavaScript開発者に幅広い機械学習ツールを提供します。brain.jsは、JavaScriptでGPU高速化ニューラルネットワークをサポートします。TensorFlow.jsはJavaScript開発者にとって最も広く使用されている機械学習の基盤ですが、これら2つのライブラリは有望な代替手段を提供します。 Neurosityには、現代の思考コンピューティングおよび脳波測定デバイスであるNotionの開発者プレビューがあります。Neurosityを他と違うのは、JavaScriptのAPIです。 アーリーアダプタ(Early Adopters) ModdableとJerryScriptは、IoTプロジェクト用の軽量ECMAScriptエンジンです。JerryScriptはOpenJS Foundationプロジェクトです。 OpenJS Foundationの一部であるNode-Redは、よくあるIoTでのイベント駆動型アプリケーションに低コードプログラミングを提供します。 johnny-fiveは、Bocoupによって開始された人気のあるJavaScriptロボットとIoTプラットフォームです。 interledger.jsは、InterledgerプロトコルのJavaScript実装です。これは、元帳、ブロックチェーン、および暗号通貨の実装にとらわれない標準のセットです。このプロジェクトはOpen JS Foundationの一部です。 アーリーマジョリティ(Early Majority) TensorFlow.jsはGoogleによって開始され、現在機械学習で最も広く使用されているJavaScriptパッケージです。 WebエンジニアのためのVisualization / XR 拡張現実、仮想現実と複合現実の使用がJavaScriptで人気を集めています。 d3とThree.jsを超えた、データの視覚化、グラフ化、および視覚化とレンダリングへの他のアプローチは、多くのプロジェクトにわたって高度に断片化されています。 Visualization/XR 2020 Q1アーリーアダプタ(Early Adopters) React 360は、Reactと同様のアプローチで開発者に複合現実体験を提供します。 WebXR 1.0勧告は最近拡張され、拡張現実標準を定義する作業が残っています。 BablyonJSは、JavaScriptおよびTypeScript開発者向けの没入型ゲームを作成するための3D視覚化およびAPIを提供します。 アーリーマジョリティ(Early Majority) Three.jsは、ブラウザでの3D描画のためのWebGL上の低レベルAPIです。 A-Frameは最近、WebXR勧告の予備サポートとともに1.0リリースに達しました。A-Frameは、Three.jsまたはネイティブWebXR機能をラップするDOMベースのアプローチを提供します。 pixi.jsは、ゲーム開発用のプリミティブを提供する別のWebGL抽象化フレームワークです。 レイトマジョリティ(Late Majority) d3は、現在広く使用されているデータ視覚化ライブラリです。 CSS CSSとデザインは、過去数年にわたって大幅な革新を遂げており、5〜10年前に作成されたCSSにはほとんど認識されない多くの方法があります。 CSS 2020 Q1イノベーター(Innovators) Algorithmic CSSは、組み込みCSSアルゴリズムを利用して構成可能なレイアウトを構築する新しいアプローチです。 アーリーアダプタ(Early Adopters) CSS Houdiniは、CSSオブジェクトモデル(CSSOM)を介したブラウザのレンダリングエンジンのスタイリングおよびレイアウトプロセスにフックすることでCSSを拡張し、CSSエンジンにアクセスする新たに登場したアプローチです。 Typed CSSは、コンポーネント開発における効率的かつ正確なスタイル設定のために、CSSモジュールにTypeScriptの安全性を提供するためにDojo他が活用するアプローチです。 Ant Designは、最新のコンポーネントの使用と開発に利用できるいくつかの一般的な設計システムの1つです。 TailwindCSSはPostCSSを利用して、低レベルのCSSフレームワークを提供します。 アーリーマジョリティ(Early Majority) Design Systemsは、組織とプロジェクトがデザイン標準とコンポーネントライブラリを共有および統合して、一貫性を維持し、再利用を促進する非常に人気のある方法になりつつあります。 CSS Gridsは、Webサイトやアプリケーションのグリッドレイアウトを管理するために広く採用されているCSS機能になりつつあります。 PostCSSはCSSプリプロセッサの代替であり、新しいCSS構文をプロダクション環境で必要な環境でサポートされている構文に変換する際にBabelのように機能します。 CSS-in-JSは、コンポーネント内でCSSをインラインでオーサリングするために、主にReactエコシステム内で人気を得ているパターンです。より優れたCSS-in-JS実装では、インラインCSSを個別のCSSファイルに変換して、プロダクション環境でのレンダリングを高速化します。 Material Designは最初の大きなオープンソースの設計仕様とシステムであり、多くのフレームワークやプロジェクトで高い人気を維持しています。 Linariaは、CSS-in-JSで広く採用されているアプローチの1つです。 レイトマジョリティ(Late Majority) レスポンシブデザインは、携帯電話、タブレット、デスクトップコンピュータ全体でアプリケーションを拡張する必要性から生まれたものであり、アプリケーションを設計するための一般的なアプローチであり続けています。レスポンシブデザインは世界をよりベクトル主導型にすることを奨励しており、世界の大多数の企業が過去10年間にロゴとデザイン標準を更新して、ソフトウェアアプリケーションだけでなく、現実の世界での使用にも対応するレスポンシブ原則をサポートしています。 CSS Flexboxは、アプリケーションレイアウトに広く使用されているモデルです。 SASSは、引き続き最も広く使用されているCSSプリプロセッサです。 Web開発コードエディタとIDE JavaScriptとWeb開発用のIDEとコードエディタは、柔軟性と機能が向上し続けています。WebベースのIDEも、従来の機能とコラボレーション機能の両方でますます強力になっています。 Code editors and IDEs 2020 Q1アーリーアダプタ(Early Adopters) StackBlitzは、ブラウザでいくつかのクラウドホスト型IDEの1つであり、数年前までデスクトップIDEでのみ可能であった幅広い機能を提供します。 アーリーマジョリティ(Early Majority) CodeSandboxは、最も広く使用されているクラウドホスト型IDEであり、ブラウザではVS Codeと呼ばれることがよくあります。 レイトマジョリティ(Late Majority) VS Codeは、その起源がMicrosoftであったために無視されてきたプロジェクトから、JavaScriptとTypeScriptエコシステムで最も広く使用されているIDEに数年で移行しました。 WebStormは、Webアプリケーションを作成するために最も広く使用されている商用デスクトップIDEです。WebStormはIntelliJと同じプロジェクトファミリーに属し、JavaからJavaScriptの世界に入ったエンジニアはIntelliJをよく使用します。 vimとemacsは引き続き人気のあるコードエディタですが、それぞれを一連の拡張機能とツールを備えたIDEに変換できます。ほとんどのvimとemacsのファンは、親しみやすさと効率性で長年の生産性の向上を築いており、別のエディタに切り替えることはほとんどありません。 MicrosoftによるGitHubの買収により、AtomはVSCodeに統合されると予想されていましたが、今のところ、それらは別個のプロジェクトのままです。AtomとVS Codeのどちらも、デスクトップ環境にElectronを活用しています。 Sublime Textは依然として多くの人が使用しているエディターですが、その人気はAtomの最初の登場、そして最近ではVS Codeの登場とともに衰え続けています。 結論 JavaScriptとWebエコシステムは成長しており、変化の速度に追いつくことは難しいかもしれませんが、このドメイン内の多くの基本的な部分が安定し、イノベーションの追加領域を生み出していると信じています。InfoQのチームは、JavaScriptとWebランドスケープの専門的な記事を提供するためにあり、私たちはフィードバック、コメント、および外部の記事の貢献を歓迎します。
0 notes
Link
The Jamstack way of thinking and building websites is becoming more and more popular. Have you already tried Gatsby, Nuxt, or Gridsome (to cite only a few)? Chances are that your first contact was a “Wow!” moment — so many things are automatically set up and ready to use. There are some challenges, though, one of which is search functionality. If you’re working on any sort of content-driven site, you’ll likely run into search and how to handle it. Can it be done without any external server-side technology? Search is not one of those things that come out of the box with Jamstack. Some extra decisions and implementation are required. Fortunately, we have a bunch of options that might be more or less adapted to a project. We could use Algolia’s powerful search-as-service API. It comes with a free plan that is restricted to non-commercial projects with a limited capacity. If we were to use WordPress with WPGraphQL as a data source, we could take advantage of WordPress native search functionality and Apollo Client. Raymond Camden recently explored a few Jamstack search options, including pointing a search form directly at Google. In this article, we will build a search index and add search functionality to a Gatsby website with Lunr, a lightweight JavaScript library providing an extensible and customizable search without the need for external, server-side services. We used it recently to add “Search by Tartan Name” to our Gatsby project tartanify.com. We absolutely wanted persistent search as-you-type functionality, which brought some extra challenges. But that’s what makes it interesting, right? I’ll discuss some of the difficulties we faced and how we dealt with them in the second half of this article.

Getting started
For the sake of simplicity, let’s use the official Gatsby blog starter. Using a generic starter lets us abstract many aspects of building a static website. If you’re following along, make sure to install and run it:
gatsby new gatsby-starter-blog https://github.com/gatsbyjs/gatsby-starter-blog cd gatsby-starter-blog gatsby develop
It’s a tiny blog with three posts we can view by opening up http://localhost:8000/___graphql in the browser.

Inverting index with Lunr.js 🙃
Lunr uses a record-level inverted index as its data structure. The inverted index stores the mapping for each word found within a website to its location (basically a set of page paths). It’s on us to decide which fields (e.g. title, content, description, etc.) provide the keys (words) for the index. For our blog example, I decided to include all titles and the content of each article. Dealing with titles is straightforward since they are composed uniquely of words. Indexing content is a little more complex. My first try was to use the rawMarkdownBody field. Unfortunately, rawMarkdownBody introduces some unwanted keys resulting from the markdown syntax.
I obtained a “clean” index using the html field in conjunction with the striptags package (which, as the name suggests, strips out the HTML tags). Before we get into the details, let’s look into the Lunr documentation. Here’s how we create and populate the Lunr index. We will use this snippet in a moment, specifically in our gatsby-node.js file.
const index = lunr(function () { this.ref('slug') this.field('title') this.field('content') for (const doc of documents) { this.add(doc) } })
documents is an array of objects, each with a slug, title and content property:
{ slug: '/post-slug/', title: 'Post Title', content: 'Post content with all HTML tags stripped out.' }
We will define a unique document key (the slug) and two fields (the title and content, or the key providers). Finally, we will add all of the documents, one by one. Let’s get started.
Creating an index in gatsby-node.js
Let’s start by installing the libraries that we are going to use.
yarn add lunr graphql-type-json striptags
Next, we need to edit the gatsby-node.js file. The code from this file runs once in the process of building a site, and our aim is to add index creation to the tasks that Gatsby executes on build. CreateResolvers is one of the Gatsby APIs controlling the GraphQL data layer. In this particular case, we will use it to create a new root field; Let’s call it LunrIndex. Gatsby’s internal data store and query capabilities are exposed to GraphQL field resolvers on context.nodeModel. With getAllNodes, we can get all nodes of a specified type:
/* gatsby-node.js */ const { GraphQLJSONObject } = require(`graphql-type-json`) const striptags = require(`striptags`) const lunr = require(`lunr`) exports.createResolvers = ({ cache, createResolvers }) => { createResolvers({ Query: { LunrIndex: { type: GraphQLJSONObject, resolve: (source, args, context, info) => { const blogNodes = context.nodeModel.getAllNodes({ type: `MarkdownRemark`, }) const type = info.schema.getType(`MarkdownRemark`) return createIndex(blogNodes, type, cache) }, }, }, }) }
Now let’s focus on the createIndex function. That’s where we will use the Lunr snippet we mentioned in the last section.
/* gatsby-node.js */ const createIndex = async (blogNodes, type, cache) => { const documents = [] // Iterate over all posts for (const node of blogNodes) { const html = await type.getFields().html.resolve(node) // Once html is resolved, add a slug-title-content object to the documents array documents.push({ slug: node.fields.slug, title: node.frontmatter.title, content: striptags(html), }) } const index = lunr(function() { this.ref(`slug`) this.field(`title`) this.field(`content`) for (const doc of documents) { this.add(doc) } }) return index.toJSON() }
Have you noticed that instead of accessing the HTML element directly with const html = node.html, we’re using an await expression? That’s because node.html isn’t available yet. The gatsby-transformer-remark plugin (used by our starter to parse Markdown files) does not generate HTML from markdown immediately when creating the MarkdownRemark nodes. Instead, html is generated lazily when the html field resolver is called in a query. The same actually applies to the excerpt that we will need in just a bit. Let’s look ahead and think about how we are going to display search results. Users expect to obtain a link to the matching post, with its title as the anchor text. Very likely, they wouldn’t mind a short excerpt as well. Lunr’s search returns an array of objects representing matching documents by the ref property (which is the unique document key slug in our example). This array does not contain the document title nor the content. Therefore, we need to store somewhere the post title and excerpt corresponding to each slug. We can do that within our LunrIndex as below:
/* gatsby-node.js */ const createIndex = async (blogNodes, type, cache) => { const documents = [] const store = {} for (const node of blogNodes) { const {slug} = node.fields const title = node.frontmatter.title const [html, excerpt] = await Promise.all([ type.getFields().html.resolve(node), type.getFields().excerpt.resolve(node, { pruneLength: 40 }), ]) documents.push({ // unchanged }) store[slug] = { title, excerpt, } } const index = lunr(function() { // unchanged }) return { index: index.toJSON(), store } }
Our search index changes only if one of the posts is modified or a new post is added. We don’t need to rebuild the index each time we run gatsby develop. To avoid unnecessary builds, let’s take advantage of the cache API:
/* gatsby-node.js */ const createIndex = async (blogNodes, type, cache) => { const cacheKey = `IndexLunr` const cached = await cache.get(cacheKey) if (cached) { return cached } // unchanged const json = { index: index.toJSON(), store } await cache.set(cacheKey, json) return json }
Enhancing pages with the search form component
We can now move on to the front end of our implementation. Let’s start by building a search form component.
touch src/components/search-form.js
I opt for a straightforward solution: an input of type="search", coupled with a label and accompanied by a submit button, all wrapped within a form tag with the search landmark role. We will add two event handlers, handleSubmit on form submit and handleChange on changes to the search input.
/* src/components/search-form.js */ import React, { useState, useRef } from "react" import { navigate } from "@reach/router" const SearchForm = ({ initialQuery = "" }) => { // Create a piece of state, and initialize it to initialQuery // query will hold the current value of the state, // and setQuery will let us change it const [query, setQuery] = useState(initialQuery) // We need to get reference to the search input element const inputEl = useRef(null) // On input change use the current value of the input field (e.target.value) // to update the state's query value const handleChange = e => { setQuery(e.target.value) } // When the form is submitted navigate to /search // with a query q paramenter equal to the value within the input search const handleSubmit = e => { e.preventDefault() // `inputEl.current` points to the mounted search input element const q = inputEl.current.value navigate(`/search?q=${q}`) } return ( <form role="search" onSubmit={handleSubmit}> <label htmlFor="search-input" style=> Search for: </label> <input ref={inputEl} id="search-input" type="search" value={query} placeholder="e.g. duck" onChange={handleChange} /> <button type="submit">Go</button> </form> ) } export default SearchForm
Have you noticed that we’re importing navigate from the @reach/router package? That is necessary since neither Gatsby’s <Link/> nor navigate provide in-route navigation with a query parameter. Instead, we can import @reach/router — there’s no need to install it since Gatsby already includes it — and use its navigate function. Now that we’ve built our component, let’s add it to our home page (as below) and 404 page.
/* src/pages/index.js */ // unchanged import SearchForm from "../components/search-form" const BlogIndex = ({ data, location }) => { // unchanged return ( <Layout location={location} title={siteTitle}> <SEO title="All posts" /> <Bio /> <SearchForm /> // unchanged
Search results page
Our SearchForm component navigates to the /search route when the form is submitted, but for the moment, there is nothing behing this URL. That means we need to add a new page:
touch src/pages/search.js
I proceeded by copying and adapting the content of the the index.js page. One of the essential modifications concerns the page query (see the very bottom of the file). We will replace allMarkdownRemark with the LunrIndex field.
/* src/pages/search.js */ import React from "react" import { Link, graphql } from "gatsby" import { Index } from "lunr" import Layout from "../components/layout" import SEO from "../components/seo" import SearchForm from "../components/search-form"
// We can access the results of the page GraphQL query via the data props const SearchPage = ({ data, location }) => { const siteTitle = data.site.siteMetadata.title // We can read what follows the ?q= here // URLSearchParams provides a native way to get URL params // location.search.slice(1) gets rid of the "?" const params = new URLSearchParams(location.search.slice(1)) const q = params.get("q") || ""
// LunrIndex is available via page query const { store } = data.LunrIndex // Lunr in action here const index = Index.load(data.LunrIndex.index) let results = [] try { // Search is a lunr method results = index.search(q).map(({ ref }) => { // Map search results to an array of {slug, title, excerpt} objects return { slug: ref, ...store[ref], } }) } catch (error) { console.log(error) } return ( // We will take care of this part in a moment ) } export default SearchPage export const pageQuery = graphql` query { site { siteMetadata { title } } LunrIndex } `
Now that we know how to retrieve the query value and the matching posts, let’s display the content of the page. Notice that on the search page we pass the query value to the <SearchForm /> component via the initialQuery props. When the user arrives to the search results page, their search query should remain in the input field.
return ( <Layout location={location} title={siteTitle}> <SEO title="Search results" /> {q ? <h1>Search results</h1> : <h1>What are you looking for?</h1>} <SearchForm initialQuery={q} /> {results.length ? ( results.map(result => { return ( <article key={result.slug}> <h2> <Link to={result.slug}> {result.title || result.slug} </Link> </h2> <p>{result.excerpt}</p> </article> ) }) ) : ( <p>Nothing found.</p> )} </Layout> )
You can find the complete code in this gatsby-starter-blog fork and the live demo deployed on Netlify.
Instant search widget
Finding the most “logical” and user-friendly way of implementing search may be a challenge in and of itself. Let’s now switch to the real-life example of tartanify.com — a Gatsby-powered website gathering 5,000+ tartan patterns. Since tartans are often associated with clans or organizations, the possibility to search a tartan by name seems to make sense. We built tartanify.com as a side project where we feel absolutely free to experiment with things. We didn’t want a classic search results page but an instant search “widget.” Often, a given search keyword corresponds with a number of results — for example, “Ramsay” comes in six variations. We imagined the search widget would be persistent, meaning it should stay in place when a user navigates from one matching tartan to another.
Let me show you how we made it work with Lunr. The first step of building the index is very similar to the gatsby-starter-blog example, only simpler:
/* gatsby-node.js */ exports.createResolvers = ({ cache, createResolvers }) => { createResolvers({ Query: { LunrIndex: { type: GraphQLJSONObject, resolve(source, args, context) { const siteNodes = context.nodeModel.getAllNodes({ type: `TartansCsv`, }) return createIndex(siteNodes, cache) }, }, }, }) } const createIndex = async (nodes, cache) => { const cacheKey = `LunrIndex` const cached = await cache.get(cacheKey) if (cached) { return cached } const store = {} const index = lunr(function() { this.ref(`slug`) this.field(`title`) for (node of nodes) { const { slug } = node.fields const doc = { slug, title: node.fields.Unique_Name, } store[slug] = { title: doc.title, } this.add(doc) } }) const json = { index: index.toJSON(), store } cache.set(cacheKey, json) return json }
We opted for instant search, which means that search is triggered by any change in the search input instead of a form submission.
/* src/components/searchwidget.js */ import React, { useState } from "react" import lunr, { Index } from "lunr" import { graphql, useStaticQuery } from "gatsby" import SearchResults from "./searchresults"
const SearchWidget = () => { const [value, setValue] = useState("") // results is now a state variable const [results, setResults] = useState([])
// Since it's not a page component, useStaticQuery for quering data // https://www.gatsbyjs.org/docs/use-static-query/ const { LunrIndex } = useStaticQuery(graphql` query { LunrIndex } `) const index = Index.load(LunrIndex.index) const { store } = LunrIndex const handleChange = e => { const query = e.target.value setValue(query) try { const search = index.search(query).map(({ ref }) => { return { slug: ref, ...store[ref], } }) setResults(search) } catch (error) { console.log(error) } } return ( <div className="search-wrapper"> // You can use a form tag as well, as long as we prevent the default submit behavior <div role="search"> <label htmlFor="search-input" className="visually-hidden"> Search Tartans by Name </label> <input id="search-input" type="search" value={value} onChange={handleChange} placeholder="Search Tartans by Name" /> </div> <SearchResults results={results} /> </div> ) } export default SearchWidget
The SearchResults are structured like this:
/* src/components/searchresults.js */ import React from "react" import { Link } from "gatsby" const SearchResults = ({ results }) => ( <div> {results.length ? ( <> <h2>{results.length} tartan(s) matched your query</h2> <ul> {results.map(result => ( <li key={result.slug}> <Link to={`/tartan/${result.slug}`}>{result.title}</Link> </li> ))} </ul> </> ) : ( <p>Sorry, no matches found.</p> )} </div> ) export default SearchResults
Making it persistent
Where should we use this component? We could add it to the Layout component. The problem is that our search form will get unmounted on page changes that way. If a user wants to browser all tartans associated with the “Ramsay” clan, they will have to retype their query several times. That’s not ideal. Thomas Weibenfalk has written a great article on keeping state between pages with local state in Gatsby.js. We will use the same technique, where the wrapPageElement browser API sets persistent UI elements around pages. Let’s add the following code to the gatsby-browser.js. You might need to add this file to the root of your project.
/* gatsby-browser.js */ import React from "react" import SearchWrapper from "./src/components/searchwrapper" export const wrapPageElement = ({ element, props }) => ( <SearchWrapper {...props}>{element}</SearchWrapper> )
Now let’s add a new component file:
touch src/components/searchwrapper.js
Instead of adding SearchWidget component to the Layout, we will add it to the SearchWrapper and the magic happens. ✨
/* src/components/searchwrapper.js */ import React from "react" import SearchWidget from "./searchwidget"
const SearchWrapper = ({ children }) => ( <> {children} <SearchWidget /> </> ) export default SearchWrapper
Creating a custom search query
At this point, I started to try different keywords but very quickly realized that Lunr’s default search query might not be the best solution when used for instant search. Why? Imagine that we are looking for tartans associated with the name MacCallum. While typing “MacCallum” letter-by-letter, this is the evolution of the results:
m – 2 matches (Lyon, Jeffrey M, Lyon, Jeffrey M (Hunting))
ma – no matches
mac – 1 match (Brighton Mac Dermotte)
macc – no matches
macca – no matches
maccal – 1 match (MacCall)
maccall – 1 match (MacCall)
maccallu – no matches
maccallum – 3 matches (MacCallum, MacCallum #2, MacCallum of Berwick)
Users will probably type the full name and hit the button if we make a button available. But with instant search, a user is likely to abandon early because they may expect that the results can only narrow down letters are added to the keyword query. That’s not the only problem. Here’s what we get with “Callum”:
c – 3 unrelated matches
ca – no matches
cal – no matches
call – no matches
callu – no matches
callum – one match
You can see the trouble if someone gives up halfway into typing the full query. Fortunately, Lunr supports more complex queries, including fuzzy matches, wildcards and boolean logic (e.g. AND, OR, NOT) for multiple terms. All of these are available either via a special query syntax, for example:
index.search("+*callum mac*")
We could also reach for the index query method to handle it programatically. The first solution is not satisfying since it requires more effort from the user. I used the index.query method instead:
/* src/components/searchwidget.js */ const search = index .query(function(q) { // full term matching q.term(el) // OR (default) // trailing or leading wildcard q.term(el, { wildcard: lunr.Query.wildcard.LEADING | lunr.Query.wildcard.TRAILING, }) }) .map(({ ref }) => { return { slug: ref, ...store[ref], } })
Why use full term matching with wildcard matching? That’s necessary for all keywords that “benefit” from the stemming process. For example, the stem of “different” is “differ.” As a consequence, queries with wildcards — such as differe*, differen* or different* — all result in no matches, while the full term queries differe, differen and different return matches. Fuzzy matches can be used as well. In our case, they are allowed uniquely for terms of five or more characters:
q.term(el, { editDistance: el.length > 5 ? 1 : 0 }) q.term(el, { wildcard: lunr.Query.wildcard.LEADING | lunr.Query.wildcard.TRAILING, })
The handleChange function also “cleans up” user inputs and ignores single-character terms:
/* src/components/searchwidget.js */ const handleChange = e => { const query = e.target.value || "" setValue(query) if (!query.length) { setResults([]) } const keywords = query .trim() // remove trailing and leading spaces .replace(/\*/g, "") // remove user's wildcards .toLowerCase() .split(/\s+/) // split by whitespaces // do nothing if the last typed keyword is shorter than 2 if (keywords[keywords.length - 1].length < 2) { return } try { const search = index .query(function(q) { keywords // filter out keywords shorter than 2 .filter(el => el.length > 1) // loop over keywords .forEach(el => { q.term(el, { editDistance: el.length > 5 ? 1 : 0 }) q.term(el, { wildcard: lunr.Query.wildcard.LEADING | lunr.Query.wildcard.TRAILING, }) }) }) .map(({ ref }) => { return { slug: ref, ...store[ref], } }) setResults(search) } catch (error) { console.log(error) } }
Let’s check it in action:
m – pending
ma – 861 matches
mac – 600 matches
macc – 35 matches
macca – 12 matches
maccal – 9 matches
maccall – 9 matches
maccallu – 3 matches
maccallum – 3 matches
Searching for “Callum” works as well, resulting in four matches: Callum, MacCallum, MacCallum #2, and MacCallum of Berwick. There is one more problem, though: multi-terms queries. Say, you’re looking for “Loch Ness.” There are two tartans associated with that term, but with the default OR logic, you get a grand total of 96 results. (There are plenty of other lakes in Scotland.) I wound up deciding that an AND search would work better for this project. Unfortunately, Lunr does not support nested queries, and what we actually need is (keyword1 OR *keyword*) AND (keyword2 OR *keyword2*). To overcome this, I ended up moving the terms loop outside the query method and intersecting the results per term. (By intersecting, I mean finding all slugs that appear in all of the per-single-keyword results.)
/* src/components/searchwidget.js */ try { // andSearch stores the intersection of all per-term results let andSearch = [] keywords .filter(el => el.length > 1) // loop over keywords .forEach((el, i) => { // per-single-keyword results const keywordSearch = index .query(function(q) { q.term(el, { editDistance: el.length > 5 ? 1 : 0 }) q.term(el, { wildcard: lunr.Query.wildcard.LEADING | lunr.Query.wildcard.TRAILING, }) }) .map(({ ref }) => { return { slug: ref, ...store[ref], } }) // intersect current keywordSearch with andSearch andSearch = i > 0 ? andSearch.filter(x => keywordSearch.some(el => el.slug === x.slug)) : keywordSearch }) setResults(andSearch) } catch (error) { console.log(error) }
The source code for tartanify.com is published on GitHub. You can see the complete implementation of the Lunr search there.
Final thoughts
Search is often a non-negotiable feature for finding content on a site. How important the search functionality actually is may vary from one project to another. Nevertheless, there is no reason to abandon it under the pretext that it does not tally with the static character of Jamstack websites. There are many possibilities. We’ve just discussed one of them. And, paradoxically in this specific example, the result was a better all-around user experience, thanks to the fact that implementing search was not an obvious task but instead required a lot of deliberation. We may not have been able to say the same with an over-the-counter solution.
0 notes
Text
How to Add Lunr Search to your Gatsby Website
The Jamstack way of thinking and building websites is becoming more and more popular.
Have you already tried Gatsby, Nuxt, or Gridsome (to cite only a few)? Chances are that your first contact was a “Wow!” moment — so many things are automatically set up and ready to use.
There are some challenges, though, one of which is search functionality. If you’re working on any sort of content-driven site, you’ll likely run into search and how to handle it. Can it be done without any external server-side technology?
Search is not one of those things that come out of the box with Jamstack. Some extra decisions and implementation are required.
Fortunately, we have a bunch of options that might be more or less adapted to a project. We could use Algolia’s powerful search-as-service API. It comes with a free plan that is restricted to non-commercial projects with a limited capacity. If we were to use WordPress with WPGraphQL as a data source, we could take advantage of WordPress native search functionality and Apollo Client. Raymond Camden recently explored a few Jamstack search options, including pointing a search form directly at Google.
In this article, we will build a search index and add search functionality to a Gatsby website with Lunr, a lightweight JavaScript library providing an extensible and customizable search without the need for external, server-side services. We used it recently to add “Search by Tartan Name” to our Gatsby project tartanify.com. We absolutely wanted persistent search as-you-type functionality, which brought some extra challenges. But that’s what makes it interesting, right? I’ll discuss some of the difficulties we faced and how we dealt with them in the second half of this article.

Getting started
For the sake of simplicity, let’s use the official Gatsby blog starter. Using a generic starter lets us abstract many aspects of building a static website. If you’re following along, make sure to install and run it:
gatsby new gatsby-starter-blog https://github.com/gatsbyjs/gatsby-starter-blog cd gatsby-starter-blog gatsby develop
It’s a tiny blog with three posts we can view by opening up http://localhost:8000/___graphql in the browser.
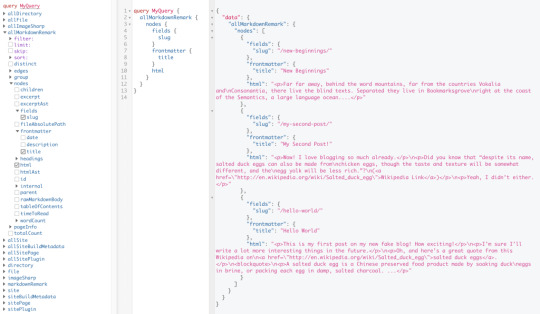
Inverting index with Lunr.js

Lunr uses a record-level inverted index as its data structure. The inverted index stores the mapping for each word found within a website to its location (basically a set of page paths). It’s on us to decide which fields (e.g. title, content, description, etc.) provide the keys (words) for the index.
For our blog example, I decided to include all titles and the content of each article. Dealing with titles is straightforward since they are composed uniquely of words. Indexing content is a little more complex. My first try was to use the rawMarkdownBody field. Unfortunately, rawMarkdownBody introduces some unwanted keys resulting from the markdown syntax.

I obtained a “clean” index using the html field in conjunction with the striptags package (which, as the name suggests, strips out the HTML tags). Before we get into the details, let’s look into the Lunr documentation.
Here’s how we create and populate the Lunr index. We will use this snippet in a moment, specifically in our gatsby-node.js file.
const index = lunr(function () { this.ref('slug') this.field('title') this.field('content') for (const doc of documents) { this.add(doc) } })
documents is an array of objects, each with a slug, title and content property:
{ slug: '/post-slug/', title: 'Post Title', content: 'Post content with all HTML tags stripped out.' }
We will define a unique document key (the slug) and two fields (the title and content, or the key providers). Finally, we will add all of the documents, one by one.
Let’s get started.
Creating an index in gatsby-node.js
Let’s start by installing the libraries that we are going to use.
yarn add lunr graphql-type-json striptags
Next, we need to edit the gatsby-node.js file. The code from this file runs once in the process of building a site, and our aim is to add index creation to the tasks that Gatsby executes on build.
CreateResolvers is one of the Gatsby APIs controlling the GraphQL data layer. In this particular case, we will use it to create a new root field; Let’s call it LunrIndex.
Gatsby’s internal data store and query capabilities are exposed to GraphQL field resolvers on context.nodeModel. With getAllNodes, we can get all nodes of a specified type:
/* gatsby-node.js */ const { GraphQLJSONObject } = require(`graphql-type-json`) const striptags = require(`striptags`) const lunr = require(`lunr`) exports.createResolvers = ({ cache, createResolvers }) => { createResolvers({ Query: { LunrIndex: { type: GraphQLJSONObject, resolve: (source, args, context, info) => { const blogNodes = context.nodeModel.getAllNodes({ type: `MarkdownRemark`, }) const type = info.schema.getType(`MarkdownRemark`) return createIndex(blogNodes, type, cache) }, }, }, }) }
Now let’s focus on the createIndex function. That’s where we will use the Lunr snippet we mentioned in the last section.
/* gatsby-node.js */ const createIndex = async (blogNodes, type, cache) => { const documents = [] // Iterate over all posts for (const node of blogNodes) { const html = await type.getFields().html.resolve(node) // Once html is resolved, add a slug-title-content object to the documents array documents.push({ slug: node.fields.slug, title: node.frontmatter.title, content: striptags(html), }) } const index = lunr(function() { this.ref(`slug`) this.field(`title`) this.field(`content`) for (const doc of documents) { this.add(doc) } }) return index.toJSON() }
Have you noticed that instead of accessing the HTML element directly with const html = node.html, we’re using an await expression? That’s because node.html isn’t available yet. The gatsby-transformer-remark plugin (used by our starter to parse Markdown files) does not generate HTML from markdown immediately when creating the MarkdownRemark nodes. Instead, html is generated lazily when the html field resolver is called in a query. The same actually applies to the excerpt that we will need in just a bit.
Let’s look ahead and think about how we are going to display search results. Users expect to obtain a link to the matching post, with its title as the anchor text. Very likely, they wouldn’t mind a short excerpt as well.
Lunr’s search returns an array of objects representing matching documents by the ref property (which is the unique document key slug in our example). This array does not contain the document title nor the content. Therefore, we need to store somewhere the post title and excerpt corresponding to each slug. We can do that within our LunrIndex as below:
/* gatsby-node.js */ const createIndex = async (blogNodes, type, cache) => { const documents = [] const store = {} for (const node of blogNodes) { const {slug} = node.fields const title = node.frontmatter.title const [html, excerpt] = await Promise.all([ type.getFields().html.resolve(node), type.getFields().excerpt.resolve(node, { pruneLength: 40 }), ]) documents.push({ // unchanged }) store[slug] = { title, excerpt, } } const index = lunr(function() { // unchanged }) return { index: index.toJSON(), store } }
Our search index changes only if one of the posts is modified or a new post is added. We don’t need to rebuild the index each time we run gatsby develop. To avoid unnecessary builds, let’s take advantage of the cache API:
/* gatsby-node.js */ const createIndex = async (blogNodes, type, cache) => { const cacheKey = `IndexLunr` const cached = await cache.get(cacheKey) if (cached) { return cached } // unchanged const json = { index: index.toJSON(), store } await cache.set(cacheKey, json) return json }
Enhancing pages with the search form component
We can now move on to the front end of our implementation. Let’s start by building a search form component.
touch src/components/search-form.js
I opt for a straightforward solution: an input of type="search", coupled with a label and accompanied by a submit button, all wrapped within a form tag with the search landmark role.
We will add two event handlers, handleSubmit on form submit and handleChange on changes to the search input.
/* src/components/search-form.js */ import React, { useState, useRef } from "react" import { navigate } from "@reach/router" const SearchForm = ({ initialQuery = "" }) => { // Create a piece of state, and initialize it to initialQuery // query will hold the current value of the state, // and setQuery will let us change it const [query, setQuery] = useState(initialQuery) // We need to get reference to the search input element const inputEl = useRef(null) // On input change use the current value of the input field (e.target.value) // to update the state's query value const handleChange = e => { setQuery(e.target.value) } // When the form is submitted navigate to /search // with a query q paramenter equal to the value within the input search const handleSubmit = e => { e.preventDefault() // `inputEl.current` points to the mounted search input element const q = inputEl.current.value navigate(`/search?q=${q}`) } return ( <form role="search" onSubmit={handleSubmit}> <label htmlFor="search-input" style=> Search for: </label> <input ref={inputEl} id="search-input" type="search" value={query} placeholder="e.g. duck" onChange={handleChange} /> <button type="submit">Go</button> </form> ) } export default SearchForm
Have you noticed that we’re importing navigate from the @reach/router package? That is necessary since neither Gatsby’s <Link/> nor navigate provide in-route navigation with a query parameter. Instead, we can import @reach/router — there’s no need to install it since Gatsby already includes it — and use its navigate function.
Now that we’ve built our component, let’s add it to our home page (as below) and 404 page.
/* src/pages/index.js */ // unchanged import SearchForm from "../components/search-form" const BlogIndex = ({ data, location }) => { // unchanged return ( <Layout location={location} title={siteTitle}> <SEO title="All posts" /> <Bio /> <SearchForm /> // unchanged
Search results page
Our SearchForm component navigates to the /search route when the form is submitted, but for the moment, there is nothing behing this URL. That means we need to add a new page:
touch src/pages/search.js
I proceeded by copying and adapting the content of the the index.js page. One of the essential modifications concerns the page query (see the very bottom of the file). We will replace allMarkdownRemark with the LunrIndex field.
/* src/pages/search.js */ import React from "react" import { Link, graphql } from "gatsby" import { Index } from "lunr" import Layout from "../components/layout" import SEO from "../components/seo" import SearchForm from "../components/search-form"
// We can access the results of the page GraphQL query via the data props const SearchPage = ({ data, location }) => { const siteTitle = data.site.siteMetadata.title // We can read what follows the ?q= here // URLSearchParams provides a native way to get URL params // location.search.slice(1) gets rid of the "?" const params = new URLSearchParams(location.search.slice(1)) const q = params.get("q") || ""
// LunrIndex is available via page query const { store } = data.LunrIndex // Lunr in action here const index = Index.load(data.LunrIndex.index) let results = [] try { // Search is a lunr method results = index.search(q).map(({ ref }) => { // Map search results to an array of {slug, title, excerpt} objects return { slug: ref, ...store[ref], } }) } catch (error) { console.log(error) } return ( // We will take care of this part in a moment ) } export default SearchPage export const pageQuery = graphql` query { site { siteMetadata { title } } LunrIndex } `
Now that we know how to retrieve the query value and the matching posts, let’s display the content of the page. Notice that on the search page we pass the query value to the <SearchForm /> component via the initialQuery props. When the user arrives to the search results page, their search query should remain in the input field.
return ( <Layout location={location} title={siteTitle}> <SEO title="Search results" /> {q ? <h1>Search results</h1> : <h1>What are you looking for?</h1>} <SearchForm initialQuery={q} /> {results.length ? ( results.map(result => { return ( <article key={result.slug}> <h2> <Link to={result.slug}> {result.title || result.slug} </Link> </h2> <p>{result.excerpt}</p> </article> ) }) ) : ( <p>Nothing found.</p> )} </Layout> )
You can find the complete code in this gatsby-starter-blog fork and the live demo deployed on Netlify.
Instant search widget
Finding the most “logical” and user-friendly way of implementing search may be a challenge in and of itself. Let’s now switch to the real-life example of tartanify.com — a Gatsby-powered website gathering 5,000+ tartan patterns. Since tartans are often associated with clans or organizations, the possibility to search a tartan by name seems to make sense.
We built tartanify.com as a side project where we feel absolutely free to experiment with things. We didn’t want a classic search results page but an instant search “widget.” Often, a given search keyword corresponds with a number of results — for example, “Ramsay” comes in six variations. We imagined the search widget would be persistent, meaning it should stay in place when a user navigates from one matching tartan to another.
Let me show you how we made it work with Lunr. The first step of building the index is very similar to the gatsby-starter-blog example, only simpler:
/* gatsby-node.js */ exports.createResolvers = ({ cache, createResolvers }) => { createResolvers({ Query: { LunrIndex: { type: GraphQLJSONObject, resolve(source, args, context) { const siteNodes = context.nodeModel.getAllNodes({ type: `TartansCsv`, }) return createIndex(siteNodes, cache) }, }, }, }) } const createIndex = async (nodes, cache) => { const cacheKey = `LunrIndex` const cached = await cache.get(cacheKey) if (cached) { return cached } const store = {} const index = lunr(function() { this.ref(`slug`) this.field(`title`) for (node of nodes) { const { slug } = node.fields const doc = { slug, title: node.fields.Unique_Name, } store[slug] = { title: doc.title, } this.add(doc) } }) const json = { index: index.toJSON(), store } cache.set(cacheKey, json) return json }
We opted for instant search, which means that search is triggered by any change in the search input instead of a form submission.
/* src/components/searchwidget.js */ import React, { useState } from "react" import lunr, { Index } from "lunr" import { graphql, useStaticQuery } from "gatsby" import SearchResults from "./searchresults"
const SearchWidget = () => { const [value, setValue] = useState("") // results is now a state variable const [results, setResults] = useState([])
// Since it's not a page component, useStaticQuery for quering data // https://www.gatsbyjs.org/docs/use-static-query/ const { LunrIndex } = useStaticQuery(graphql` query { LunrIndex } `) const index = Index.load(LunrIndex.index) const { store } = LunrIndex const handleChange = e => { const query = e.target.value setValue(query) try { const search = index.search(query).map(({ ref }) => { return { slug: ref, ...store[ref], } }) setResults(search) } catch (error) { console.log(error) } } return ( <div className="search-wrapper"> // You can use a form tag as well, as long as we prevent the default submit behavior <div role="search"> <label htmlFor="search-input" className="visually-hidden"> Search Tartans by Name </label> <input id="search-input" type="search" value={value} onChange={handleChange} placeholder="Search Tartans by Name" /> </div> <SearchResults results={results} /> </div> ) } export default SearchWidget
The SearchResults are structured like this:
/* src/components/searchresults.js */ import React from "react" import { Link } from "gatsby" const SearchResults = ({ results }) => ( <div> {results.length ? ( <> <h2>{results.length} tartan(s) matched your query</h2> <ul> {results.map(result => ( <li key={result.slug}> <Link to={`/tartan/${result.slug}`}>{result.title}</Link> </li> ))} </ul> </> ) : ( <p>Sorry, no matches found.</p> )} </div> ) export default SearchResults
Making it persistent
Where should we use this component? We could add it to the Layout component. The problem is that our search form will get unmounted on page changes that way. If a user wants to browser all tartans associated with the “Ramsay” clan, they will have to retype their query several times. That’s not ideal.
Thomas Weibenfalk has written a great article on keeping state between pages with local state in Gatsby.js. We will use the same technique, where the wrapPageElement browser API sets persistent UI elements around pages.
Let’s add the following code to the gatsby-browser.js. You might need to add this file to the root of your project.
/* gatsby-browser.js */ import React from "react" import SearchWrapper from "./src/components/searchwrapper" export const wrapPageElement = ({ element, props }) => ( <SearchWrapper {...props}>{element}</SearchWrapper> )
Now let’s add a new component file:
touch src/components/searchwrapper.js
Instead of adding SearchWidget component to the Layout, we will add it to the SearchWrapper and the magic happens.

/* src/components/searchwrapper.js */ import React from "react" import SearchWidget from "./searchwidget"
const SearchWrapper = ({ children }) => ( <> {children} <SearchWidget /> </> ) export default SearchWrapper
Creating a custom search query
At this point, I started to try different keywords but very quickly realized that Lunr’s default search query might not be the best solution when used for instant search.
Why? Imagine that we are looking for tartans associated with the name MacCallum. While typing “MacCallum” letter-by-letter, this is the evolution of the results:
m – 2 matches (Lyon, Jeffrey M, Lyon, Jeffrey M (Hunting))
ma – no matches
mac – 1 match (Brighton Mac Dermotte)
macc – no matches
macca – no matches
maccal – 1 match (MacCall)
maccall – 1 match (MacCall)
maccallu – no matches
maccallum – 3 matches (MacCallum, MacCallum #2, MacCallum of Berwick)
Users will probably type the full name and hit the button if we make a button available. But with instant search, a user is likely to abandon early because they may expect that the results can only narrow down letters are added to the keyword query.
That’s not the only problem. Here’s what we get with “Callum”:
c – 3 unrelated matches
ca – no matches
cal – no matches
call – no matches
callu – no matches
callum – one match
You can see the trouble if someone gives up halfway into typing the full query.
Fortunately, Lunr supports more complex queries, including fuzzy matches, wildcards and boolean logic (e.g. AND, OR, NOT) for multiple terms. All of these are available either via a special query syntax, for example:
index.search("+*callum mac*")
We could also reach for the index query method to handle it programatically.
The first solution is not satisfying since it requires more effort from the user. I used the index.query method instead:
/* src/components/searchwidget.js */ const search = index .query(function(q) { // full term matching q.term(el) // OR (default) // trailing or leading wildcard q.term(el, { wildcard: lunr.Query.wildcard.LEADING | lunr.Query.wildcard.TRAILING, }) }) .map(({ ref }) => { return { slug: ref, ...store[ref], } })
Why use full term matching with wildcard matching? That’s necessary for all keywords that “benefit” from the stemming process. For example, the stem of “different” is “differ.” As a consequence, queries with wildcards — such as differe*, differen* or different* — all result in no matches, while the full term queries differe, differen and different return matches.
Fuzzy matches can be used as well. In our case, they are allowed uniquely for terms of five or more characters:
q.term(el, { editDistance: el.length > 5 ? 1 : 0 }) q.term(el, { wildcard: lunr.Query.wildcard.LEADING | lunr.Query.wildcard.TRAILING, })
The handleChange function also “cleans up” user inputs and ignores single-character terms:
/* src/components/searchwidget.js */ const handleChange = e => { const query = e.target.value || "" setValue(query) if (!query.length) { setResults([]) } const keywords = query .trim() // remove trailing and leading spaces .replace(/\*/g, "") // remove user's wildcards .toLowerCase() .split(/\s+/) // split by whitespaces // do nothing if the last typed keyword is shorter than 2 if (keywords[keywords.length - 1].length < 2) { return } try { const search = index .query(function(q) { keywords // filter out keywords shorter than 2 .filter(el => el.length > 1) // loop over keywords .forEach(el => { q.term(el, { editDistance: el.length > 5 ? 1 : 0 }) q.term(el, { wildcard: lunr.Query.wildcard.LEADING | lunr.Query.wildcard.TRAILING, }) }) }) .map(({ ref }) => { return { slug: ref, ...store[ref], } }) setResults(search) } catch (error) { console.log(error) } }
Let’s check it in action:
m – pending
ma – 861 matches
mac – 600 matches
macc – 35 matches
macca – 12 matches
maccal – 9 matches
maccall – 9 matches
maccallu – 3 matches
maccallum – 3 matches
Searching for “Callum” works as well, resulting in four matches: Callum, MacCallum, MacCallum #2, and MacCallum of Berwick.
There is one more problem, though: multi-terms queries. Say, you’re looking for “Loch Ness.” There are two tartans associated with that term, but with the default OR logic, you get a grand total of 96 results. (There are plenty of other lakes in Scotland.)
I wound up deciding that an AND search would work better for this project. Unfortunately, Lunr does not support nested queries, and what we actually need is (keyword1 OR *keyword*) AND (keyword2 OR *keyword2*).
To overcome this, I ended up moving the terms loop outside the query method and intersecting the results per term. (By intersecting, I mean finding all slugs that appear in all of the per-single-keyword results.)
/* src/components/searchwidget.js */ try { // andSearch stores the intersection of all per-term results let andSearch = [] keywords .filter(el => el.length > 1) // loop over keywords .forEach((el, i) => { // per-single-keyword results const keywordSearch = index .query(function(q) { q.term(el, { editDistance: el.length > 5 ? 1 : 0 }) q.term(el, { wildcard: lunr.Query.wildcard.LEADING | lunr.Query.wildcard.TRAILING, }) }) .map(({ ref }) => { return { slug: ref, ...store[ref], } }) // intersect current keywordSearch with andSearch andSearch = i > 0 ? andSearch.filter(x => keywordSearch.some(el => el.slug === x.slug)) : keywordSearch }) setResults(andSearch) } catch (error) { console.log(error) }
The source code for tartanify.com is published on GitHub. You can see the complete implementation of the Lunr search there.
Final thoughts
Search is often a non-negotiable feature for finding content on a site. How important the search functionality actually is may vary from one project to another. Nevertheless, there is no reason to abandon it under the pretext that it does not tally with the static character of Jamstack websites. There are many possibilities. We’ve just discussed one of them.
And, paradoxically in this specific example, the result was a better all-around user experience, thanks to the fact that implementing search was not an obvious task but instead required a lot of deliberation. We may not have been able to say the same with an over-the-counter solution.
The post How to Add Lunr Search to your Gatsby Website appeared first on CSS-Tricks.
source https://css-tricks.com/how-to-add-lunr-search-to-your-gatsby-website/
from WordPress https://ift.tt/3eKOx2M via IFTTT
0 notes